
Chapter 12 of the IREn User Guide
Extensions to the XSL 1.0 Recommendation
IREn implements several extensions to the Specification, placed into a separate namespace: xmlns:rx="http://www.renderx.com/XSL/Extensions". They add support for useful functionality that cannot be expressed by XSL Formatting Objects.
B.1. Document Information
This extension permits passing a set of name/value pairs to the generator of the output format. A typical application is setting PDF document info fields (‘Author’ and ‘Title’). Implementation uses two extension elements: <rx:meta-info> and <rx:meta-field>.
-
<rx:meta-info>This element is merely a container for one or more<rx:meta-field>elements. It should be the first child of<fo:root>. -
<rx:meta-field>This element specifies a single name/value pair. It has two mandatory attributes:nameandvalue. Current implementation of the PDF and PostScript generators recognize six possible values forname:-
name="author"-fills the‘Author’field in the resulting PDF file with a string specified by thevalueproperty. -
name="creator"- fills the‘Creator’field. -
name="title"- fills the‘Title’field. -
name="subject"- fills the‘Subject’field. -
name="keywords"- fills the‘Keywords’field. -
name="publisher"- fills the‘Publisher’field (in XMP metadata only).
The
‘Producer’field in the PDF file is set to the current IREn version (e.g."XEP 4.31.529"); there is no means to control it from the source file. All other values fornameare treated as custom meta-fields and appear in the same dictionaries in PostScript and PDF as predefined meta-fields. Unicode values fornameare not supported.In the PostScript generator module, the document info fields are added using the
pdfmarkoperator. The respective fields are filled when PostScript is converted to PDF using Adobe Acrobat Distiller or GhostScript. -
-
XMP Metadata
 Starting from version 4.18, it is possible to specify name-value pairs to be inserted directly into XMP metadata of the document. When the document opened in a PDF viewer, this data will be visible in document Properties.
This feature is compatible with PDF/A compliance, too.
In order to use XMP metadata, two fields have to be specified first:
-
name="namespace"- specifies URL address of XML namespace which would be used (ex."http://www.renderx.com/XSL/Extensions"). -
name="prefix"- specifies abbreviation of the namespace (ex."rx").
All other
meta-fieldentries would be included into XMP metadata of the document.Example:
<rx:meta-info> <rx:meta-field name="namespace" value="http://www.renderx.com/XSL/Extensions" /> <rx:meta-field name="prefix" value="rx" /> <rx:meta-field name="ConsumerId" value="XXXXXX" /> <rx:meta-field name="Document_ID" value="YYYYYY" /> <rx:meta-field name="Description" value="ZZZZZZ" /> </rx:meta-info> -
B.2. Document Outline (Bookmarks)
Implementation of a document outline uses the following three extension elements:
-
<rx:outline>- The top-level element of the document outline tree. It should be located before any<fo:page-sequence>elements, and after the<fo:layout-master-set>and the<fo:declarations>elements (if present). It contains one or more<rx:bookmark>elements. -
<rx:bookmark>- This element contains information about a single bookmark. It contains a mandatory<rx:bookmark-label>element as its first child, and zero or more nested<rx:bookmark>elements that describe nested bookmarks. Bookmark destination is expressed either byinternal-destinationproperty (for internal navigation), or byexternal-destination(for extra-document links). The initial presentation of the children bookmarks is controlled bycollapse-subtreeattribute. Values are either"true"(collapse children) or"false"(expand children).Note: The default value for
collapse-subtreewas"true"until IREn 4.19. However, the matching XSL 1.1 attributestarting-statehas the default value of"show", so Starting from version 4.19 and later the default behavior is that of XSL 1.1, i.e. to expand children. -
<rx:bookmark-label>- This element contains text of a bookmark label. It must be the first child of its parent<fo:bookmark>. Content of this element should be plain text. The appearance of bookmark label is controlled bycolor,font-styleandfont-weightattributes, introduced in XSL 1.1 and supported in IREn Starting from version 4.19.
B.3. Indexes
Building page number lists for back-of-the-book indexes is a common task. It is relatively easy to collect a list of references to index terms in the text; but then, to turn them into a real index entry, you should exclude repeated page numbers and merge adjacent numbers into ranges. Neither of these two operations can be done in XSL 1.0. Therefore, IREn supports an extension for this purpose.
The task of building an index can be split in two subtasks:
-
Mark up occurrences of index terms in the main text.
-
Specify composition and formatting of page number lists in the index.
B.3.1. Index Term Markup
In order to mark up occurrences of the index terms in the text, IREn introduces a special extension attribute: rx:key. It can be specified on any element that can take an id attribute; unlike the latter, it need not be unique across the document. Its value is used as a key to select elements for the page number list. For example, an index term to the word "rendering" might look like this:
The process of converting XSL-FO to a printable format
    is called <fo:inline rx:key="key.render">rendering.</fo:inline>
There is also a mechanism to specify an explicit range, not distinct elements. Two extension elements serve this purpose:
-
<rx:begin-index-range>Starts a range. It takes two attributes, both required:-
idA unique identifier used to define the limits of the range. -
rx:keyIndex key used to select the range into a page number list.
-
-
<rx:end-index-range>Ends a range. It takes one attribute, required:ref-idA reference to theidattribute of the<rx:begin-index-range>that started the range.
These two elements always form a pair. These elements may be located anywhere inside <fo:flow>; there are no constraints on their nesting with respect to other elements.
B.3.2. Index Entries
In the index, the actual page reference is created by another extension element, <rx:page-index>. It picks elements from the text by their rx:key properties, and produces a sorted list of their page numbers, eliminating duplicates.
<rx:page-index> should contain one or more <rx:index-item> elements as children. Each <rx:index-item> has a required ref-key attribute, and selects elements that have an rx:key attribute with the same value.
A distinct element bearing the appropriate rx:key value is represented as follows:
-
If it fits completely onto one page, it is represented as a single page number.
-
If it spans multiple pages, its entry is formatted as a range from the first to the last of the spanned pages.
A range (created by a <rx:begin-index-range> and <rx:end-index-range> element pair) is represented as a range from the page where <rx:begin-index-range> is located to the page of its matching <rx:end-index-range>.
A basic entry in an index looks like this:
<fo:inline rx:key="key.elephant">Elephants</fo:inline> live in Africa. …
<fo:inline rx:key="key.elephant">African elephants</fo:inline> have big ears …
…
<fo:block text-align="center" font="bold 16pt Futura">INDEX</fo:block>
<fo:block>
    Elephants <rx:page-index>
                   <rx:index-item ref-key="key.elephant"/>
              </rx:page-index>
</fo:block>
There are other attributes of <rx:index-item> to control the formatting of the index entry:
-
range-separatorSpecifies the string used to separate page numbers that form a continuous range. Default is en dash:"–" (U+2013). -
merge-subsequent-page-numbersControls whether sequences of adjacent page numbers should be merged into ranges. Default is"true."Note: The default value for property
merge-subsequent-page-numberswas"false"before IREn 4.19. However, the matching XSL 1.1 propertymerge-sequential-page-numbershas the default value of"merge". This conflict of defaults has been resolved Starting from version 4.19 in favour of XSL 1.1, and the default behavior is to merge. -
link-backIf set to"true", page numbers are made into hyperlinks to the corresponding page. Default is"false."
Besides that, <rx:index-item> can take additional inline attributes, applied to each page number generated from this element. This allows for different presentation styles across the list, e.g. To make references to primary definitions bold.
B.4. Flow Sections
Flow sections permit splitting the flow into subflows, with different column counts in each subflow. The following element creates flow sections:
<rx:flow-section>This element must be a direct child of<fo:flow>. It can be mixed with other block-level elements. It takes two attributes: column-count, the number of columns for the subflow, and columngap, the space between the columns.
B.5. Last Page Number Reference
This extension element retrieves the number of the last page occupied by a particular element. Its syntax and semantics are similar to <fo:page-number-citation>.
<rx:page-number-citation-last>The only required attribute,ref-id, specifies theidof the element whose last page number you want to retrieve. In particular, by referencing theidof the<fo:root>element, it is possible to retrieve the number of the last page in the document.
Note: This element is described in XSL 1.1 Working Draft of 17 December 2003. In subsequent versions of IREn, it is likely to move to the standard XSL-FO namespace.
B.6. Change Bars
IREn has support for change regions, as described in XSL 1.1 Working Draft of December 16, 2004.
<rx:change-bar-begin>,<rx:change-bar-end>These elements have exactly the same meaning and properties as listed in the Working Draft for elements<fo:change-bar-begin>and<fo:change-bar-end>, sections 6.3.12 and 6.3.13, respectively. In future versions of IREn, when XSL 1.1 will become the W3C Recommendation, they will be moved to the standard XSL-FO namespace.
Note: The content model for these elements is different than the description in the Working Draft. The Working Draft, Section 6.2, says the following about change-bar-begin/end elements: “The following formatting objects are "neutral" containers and may be used, provided that the additional constraints listed under each formatting object are satisfied, anywhere where #PCDATA, %block;, or %inline; are allowed”.” This essentially forbids
change-bar-begin/endelements from appearing almost anywhere in the lists or tables, for example, it’s not possible to mark a whole list-item or table-cell as “changed.” IREn implementation does not have such limitations, change bar anchors can be placed almost anywhere in the flow.
B.7. Background Image Scaling and Content Type
In XSL 1.0, there is no provision to scale/size a background image. IREn implements this functionality via the following extension properties:
rx:background-content-height,rx:background-content-width,rx:background-scaling,rx:background-content-typeThese properties have exactly the same semantics ascontent-height,content-width,scaling, andcontent-type, respectively. They apply to the image specified inbackground-imageproperty (or insidebackgroundshorthand).
B.8. Initial Destination
This extension allows you to specify the destination to jump to when the document is first opened. It uses a single extension attribute, rx:initial-destination placed on <fo:root>; its syntax is the same as the internal-destination attribute.
B.9. Omitted Initial Header in Tables
This extension permits you to omit a table header at the beginning of a table. This feature can be used to create "continuation headers", which are output only on page breaks. It uses a single extension attribute, rx:table-omit-initial-header placed on <fo:table>. The property has a Boolean value: "true" or "false" — same as for table-omit-header-at-break.
B.10. Base URI Definition: xml:base
IREn recognizes and processes xml:base attribute, defined in XML Base Recommendation. It permits you to set the base for resolving relative URIs (link targets, image locations, fonts, hyphenation patterns, etc) for the whole document or a single subtree.
Note: The use of
xml:basein XSL is not authorized by the XSL Specification; therefore, this option should be considered a proprietary extension to XSL.
B.11. Rounded Borders
Starting from version 4.30, it is possible to specify rx:border-radius attribute extension for creating rounded corners on block areas.
Minimal Example. To define the properties for all four corners via a single shorthand:
rx:border-radius="10px"
The complete rx:border-radius syntax follows the border-radius syntax of CSS specification.
Each rounded corner has a shape of a quarter ellipse, which, in turn, is defined by its horizontal and vertical radius.
So there are one to eight length-percentage values, separated by space and/or slash:
<length-percentage>{1,4} [ / <length-percentage>{1,4} ]?
Value types. The values for radii can be specified in absolute units or as a percentage value.
Absolute values can be expressed in the following units: px, pc, pt, cm, mm, in.
Percentages for the horizontal radius refer to the width of the border box; percentages for the vertical radius refer to the height of the border box.
Other unit identifiers are not supported.
Zero Radii. If either radius for a certain corner is zero, the corner is square, not rounded.
Negative values for either raduis are not supported.
The four values in each group are given in the order top-left, top-right, bottom-right, bottom-left.
If bottom-left is omitted, it is assumed equal to top-right.
If bottom-right is omitted, it is assumed equal to top-left.
If top-right is omitted, it is assumed equal to top-left.
Horizontal and Vertical Radii. The first group (before slash) specify the horizontal radius, and the second group (after slash) set the vertical radius. If the values after slash are skipped, the vertical radii are copied from the respective horizontal ones.
Note: Unlike the CSS specification mentioned above that supports a syntax for rounded borders for each individual corner (like
border-top-left-radius), IREn only accepts the shorthand form of rounded border specification.
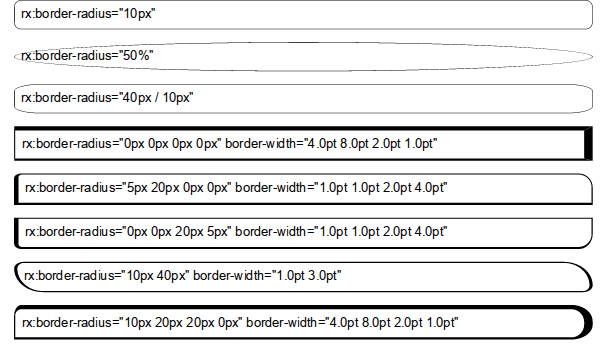
Below are several practical examples:
Figure B.1. Practical Examples For rx:border-radius
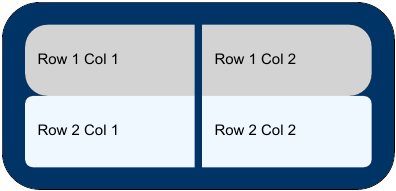
rx:border-radius can be used on tables along with border-collapse="separate". Below is a table with rx:border-radius set for the table itself and for individual cells:
Figure B.2. rx:border-radius Used For Table
rx:border-radius can be used with zero borders for shaping the background. The example below demonstrates a text on a tiled background with rounded corners:
Figure B.3. rx:border-radius Used For Background

See also: Appendix F for the full set of supported drawables in IREn Intermediate output format.
Limitations.
-
Border-radii support only solid style, no support for dashed or dotted.
-
Borders that are thicker than the radius of the corner (
rx:border-widthis greater thanrx:border-radius) would have no inner radii. -
If a block has different colors of its adjoining borders (e.g., left and top), and one or both borders are Rounded, they may touch in an underined way.
-
rx:border-radiusworks with PDF Forms module, however it doesn't affect the background filling or clipping, except the rounded radio button hack. -
If a block with rounded border breaks on page break, the rounded corners would appear on both pages, which may lead to inconsisten results (e.g., height percentage calculation).
-
Rounded borders are rendered as Bézier curves. Only PDF, PostSript, XPS, and SVG output formats are currently supported.
B.12. Border and Padding on Regions
In the XSL Recommendation, border and padding properties are permitted on region elements ( <fo:region-body>, <fo:region-before>, <fo:region-after>, <fo:region-start>, and <fo:region-end>). However, they may accept values of 0 (sic!). In IREn, non-zero values of these properties result in a border around the respective region area, and its content rectangle is padded by the specified amount.
Note: When validation strictness level is
2, the validator issues a warning about nonzero borders and padding on regions.
B.13. Floats Alignment
Floating figures often need to float towards different sides of the page depending on their parity. However in XSL 1.0 Recommendation there is no means to achieve such effect. IREn supports two additional values for float property of the <fo:float> element. Those values are: "inside" and "outside". Their meaning is the same as in text-align property defined by XSL 1.0 Recommendation: "inside" value aligns floating block to the inner edge of the page (left for odd pages, right for even pages) and "outside" aligns floating block to the outer edge of the page (right for odd pages, left for even pages). This functionality is often used to create margin notes known as "marginalia."
B.14. Multicolumn Footnotes
Some documents have many short footnotes per page, and according to the Recommendation all the footnotes are stacked ontop of each other. This results in a lot of white space to the right of the footnotes in footnote-reference-area.
IREn supports two additional attributes: footnote-column-count and footnote-column-gap on <fo:region-body>. They have the same meaning as column-count and column-gap and result in footnote-reference-area having the required number of columns separated with gaps. IREn balances the footnotes among the columns in footnote-reference-area, which makes the area be filled better and have smaller height, leaving more space for the body.
Note:
The balancing algorithm is iterative and may affect performance in corner cases. The best quality of balancing is achieved in the most common cases: for short footnotes.
B.15. Unique Footnotes
There is a user's request to collapse footnote-bodies on a page if their anchors read the same. This is useful if, for example, several values in table cells must be marked with one and the same note. The Recommendation does not provide a way to achieve this, because one must know beforehand how the footnotes will be distributed among pages.
IREn can handle this request properly. A footnote-body will not be added to the footnote-reference-area if there is a footnote-body starting on this page wich has the same value of id. In other words, footnotes with equal footnote-body/@id collapse to one per page.
Note:
If a footnote-body starts on page N and continues on page N+1, there may appear another footnote-body with the same
idon page N+1: the tail of a footnote may not collapse.
Note:
Collapsed footnote-bodies are treated as if they were empty. Any special content (a term for the index, a target for a link, a part of a 'paired' element such a change-bar or an index-range) will be ignored. Avoid using such content together with the 'unique footnotes' feature.
B.16. Watermark
In mass print large number of pages differ in content, but not in static regions. IREn spends a significant share of time formatting static regions on each page. The request is to avoid formatting common parts of pages on each page to save time, and instead pick them up from an XEPOUT file prepared beforehand.
IREn provides an extension for this request: rx:watermark attribute on <fo:simple-page-master>. The value of rx:watermark is an URI reference to an IREn intermediate format file.
For every page created with a given page master, the content of the first <xep:page> of master's watermark file will be drawn before anything else on the page.
Note:
This extension saves formatting time for static contents, but does not reduce the time required to generate it to an output format.
Note:
Do not forget to remove targets and bookmarks from a watermark file.
Note:
No scaling is performed on the content of the watermark file, it is 'played' as is.
B.17. Transpromo
Empty space often appears at the bottom of pages, especially of the last pages of page sequences. This space may be used for ads. Arbitrary content of a flow makes it impossible to tell how much space will be left on the last page beforehand, so for arbitrary content there is no way to determine the size of the ads box that will fit without making the flow content go to yet another page.
Having a set of ads boxes of different size, users need a way to place the largest such box (just one) that fits on the last page.
'Transpromo' is an extension to the page master selection algorithm that makes IREn iterate over a set of page masters that suite for 'last' until it finds one where all the tail of the flow content fits. For the sake of compatibility, alternatives for 'any' are not considered in the loop.
With the extended algorithm users may specify a set of <fo:conditional-page-master-references>, all with page-position='last', in desired order. These page masters may, for example, have different extent on <fo:region-after>, from large to small values (in order of reading the <fo:conditional-page-master-references> in <fo:repeatable-page-master-alternatives>). The <fo:page-sequence> will have the respective set of <fo:static-contents> with the ads boxes. The largest box that fits together with the flow content will succeed, and formatting will end.
The extended algorithm works similarly for the page masters for 'only'.
B.18. PDF Forms
Starting from version 4.16, IREn is able to produce PDF documents with interactive forms. This feature is controlled by a special license key file.
The following Form Fields are supported:
-
Text field, including specially formatted Date field
-
Radio button
-
Checkbox
-
Listbox
-
Combobox
-
Submit and Reset buttons
Starting from version 4.28, IREn fully supports:
- Signature field
The new extension element <pdf-form-field> with it's descendants describes a single field in the form. This element and it's descendants exist both in 'rx:' and in 'xep:' namespaces, so one may define fields in XSL FO documents or in IREn Intermediate Format documents.
In XSL FO the element <rx:pdf-form-field> is allowed as a direct child of <fo:inline> or <fo:block-container> only. When the document is rendered the field is attached to the first area produced by it's parent <fo:inline> or <fo:block-container>.
Empty inlines or block-containers without dimensions produce no areas, so make sure to add something into the inline besides the field, and add something into the block-container or set dimentionals on it. Otherwize the field may be skipped or become zero size.
Type1 fonts in fields must use 'standard' encoding and may not be subset, so do not forget to add initial-encoding="standard" and subset="false" on the font-families used for fields in xep.xml.
Starting from version 4.30, it is possible to set alignment for Text fields by using text-align attribute. Supported values are left (default), center, and right (alias end).
Date fields in PDF Forms allow for entering date. This includes two aspects: validating the entered value according to an arbitrary format and display a popup calendar to make the entry comfortable. The basic approach is using JavaScript fields:
<rx:pdf-form-field name="textbox1"
    js-format="AFDate_FormatEx('mm/dd/yyyy');"
    js-keystroke="AFDate_KeystrokeEx('mm/dd/yyyy');">
    <rx:pdf-form-field-text text="" />
</rx:pdf-form-field>
Alternatively, IREn provides with a shortcut using the <date-format> attribute, both declarations are equal:
<rx:pdf-form-field name="textbox2">
    <rx:pdf-form-field-text date-format="mm/dd/yyyy" text="" />
</rx:pdf-form-field>
In XEPOUT the element <xep:pdf-form-field> additionally wears mandatory positioning attributes x-from, y-from, x-till, y-till. Positioning is usually calculated by IREn core during the rendering process, but may be altered in XEPOUT by the user.
Note: Some Form Fields, like Signature field, have no own size. In order to make it visible, it is recommended to add a visible child element to a containing
<fo:block-container>, usually just a<fo:leader>, like in example below:<fo:block-container> <rx:pdf-form-field name="Signature"> <rx:pdf-form-field-signature /> </rx:pdf-form-field> <fo:block> <fo:leader/> </fo:block> </fo:block-container>
Starting from version 4.30, Radio buttons can be defined as deselectable by using deselectable attribute. Supported values are true and false (default). This can be used for various purposes, including two groups of Radio buttons which are mutually exclusive, or simply allowing for a certain group of Radio buttons to have a default, unchosen value.
The following DTD defines the extension elements and attributes. Namespaces are skipped, which means that both 'rx:' and 'xep:' apply. In XEPOUT the fields look pretty much the same, with some differences.
<!ENTITY % fields
  " pdf-form-field-text
  | pdf-form-field-radio-button
  | pdf-form-field-checkbox
  | pdf-form-field-listbox
  | pdf-form-field-combobox
  | pdf-form-field-signature
  | pdf-form-field-reset
  | pdf-form-field-submit
  | pdf-form-field-option">

<!ENTITY % appearance_inh
  " font-family CDATA #IMPLIED
  | font-size CDATA #IMPLIED
  | font-weight CDATA #IMPLIED
  | font-style CDATA #IMPLIED
  | color CDATA #IMPLIED">

<!ENTITY % appearance
  " background-color CDATA #IMPLIED
  | border-width CDATA #IMPLIED
  | border-style CDATA #IMPLIED
  | border-color CDATA #IMPLIED">

<!ENTITY % behavior
  " date-format CDATA #IMPLIED">

<!ELEMENT pdf-form-field (%fields;)>
<!-- just one particular field! -->
<!ATTLIST pdf-form-field
  name CDATA #REQUIRED
  readonly (true | false) #IMPLIED
  required (true | false) #IMPLIED
  noexport (true | false) #IMPLIED
  hidden (true | false) #IMPLIED
  printable (true | false) #IMPLIED
  js-format CDATA #IMPLIED
  js-keystroke CDATA #IMPLIED
  js-validate CDATA #IMPLIED
  js-calculate CDATA #IMPLIED
  %appearance_inh; >
<!-- pdf-form-field/@name must be unique within a document.
All boolean attributes in pdf-form-field
and it's descendants default to 'false',
except for 'printable', which defaults to 'true'.
The attributes js-* define JavaScripts to be executed
by the reader on the respective events (4.17 and higher).-->

<!ELEMENT pdf-form-field-text EMPTY>
<!ATTLIST pdf-form-field-text
  text CDATA #REQUIRED
  multiline (true | false) #IMPLIED
  password (true | false) #IMPLIED
  maxlen CDATA #IMPLIED
  text-align (left | center | right) #IMPLIED
  %appearance;
  %appearance_inh;
  %behavior; >

<!ELEMENT pdf-form-field-radio-button (pdf-form-field-option,
                                       pdf-form-field-option?)>
<!-- The first child pdf-form-field-option
   describes the "On" state,
   the second one describes the "Off" state and is optional.-->
<!ATTLIST pdf-form-field-radio-button
  group-name CDATA #REQUIRED
  deselectable (true | false) #IMPLIED
  %appearance;
  %appearance_inh; >
<!-- @group-name must be the same for all radio-button fields
of the same group. If the @group-name ends with "_NoToggleToOff"
exactly one radio-button in the group will be "On" at any moment.
If @deselectable is set to "true" it takes precedence
 over "_NoToggleToOff" name ending -->

<!ELEMENT pdf-form-field-checkbox (pdf-form-field-option,
                                   pdf-form-field-option?)>
<!-- The first child pdf-form-field-option
   describes the "On" state,
   the second one describes the "Off" state and is optional.-->
<!ATTLIST pdf-form-field-checkbox
  %appearance;
  %appearance_inh; >

<!ELEMENT pdf-form-field-listbox (pdf-form-field-option+)>
<!ATTLIST pdf-form-field-listbox
  multiselect (true | false) #IMPLIED
  %appearance;
  %appearance_inh; >
<!-- @multiselect="true" is PDF 1.4+;
      for 1.3 the attribute is ignored. -->

<!ELEMENT pdf-form-field-combobox (pdf-form-field-option+)>
<!ATTLIST pdf-form-field-combobox
  editable (true | false) #IMPLIED
  multiselect (true | false) #IMPLIED
  %appearance;
  %appearance_inh; >
<!-- @multiselect="true" is PDF 1.4+;
      for 1.3 the attribute is ignored. -->

<!ELEMENT rx:pdf-form-field-signature EMPTY>

<!ELEMENT pdf-form-field-reset EMPTY>
<!ATTLIST pdf-form-field-reset
  text CDATA #REQUIRED
  fields CDATA #IMPLIED
  %appearance;
  %appearance_inh; >
<!-- @fields is a space-separated list of field names
     to act on. -->

<!ELEMENT pdf-form-field-submit EMPTY>
<!ATTLIST pdf-form-field-submit
  text CDATA #REQUIRED
  url CDATA #REQUIRED
  submit-format (HTML | FDF | XFDF | PDF) #IMPLIED
  method (GET | POST) #IMPLIED
  fields CDATA #IMPLIED
  %appearance;
  %appearance_inh; >
<!-- @fields is a space separated list of field names to act on.
If a field which @name is on the @fields list
has @noexport="true", the field's value is not submitted.
@submit-format defaults to "FDF".
@method defaults to "POST" and only applies to 'HTML' format.
if @url is a 'mailto:', the form data will be sent by email.-->

<!ELEMENT pdf-form-field-option EMPTY>
<!ATTLIST pdf-form-field-option
  text CDATA #REQIRED
  initially-selected (true | false) #IMPLIED>
B.19. JavaScript for PDF
Starting from version 4.17, IREn provides a way to add custom features for AcroFields defined as JavaScript scripts. These scripts are executed by the Reader application upon particular events that the user triggers on fields.
The scripts are expressed as attributes on <rx:pdf-form-field> element:
**Table B.1. **
| attribute | example |
|---|---|
@js-format | |
@js-keystroke | |
@js-validate | |
@js-calculate | |
The functions "AF*" mentioned above are built-in to Acrobat. It is also possible to provide a custom JavaScript library (a set of functions) for a PDF document. Functions defined in that library are available throughout the PDF document, including the hooks on the fields. The extension element <rx:pdf-javascript> requires a single attribute name and contains the library plain text, e.g. like this:
<?xml version="1.0" encoding="utf-8"?>
<fo:root xmlns:fo="http://www.w3.org/1999/XSL/Format"
    xmlns:rx="http://www.renderx.com/XSL/Extensions">
    <rx:pdf-javascript name="myJSLib">
        function v_email() {
            var email = new RegExp();
            email.compile("^[a-zA-Z0-9._-]+@[a-zA-Z0-9.-]+\.[a-zA-Z]{2,4}$");
            // not the best one though
            if (!email.test(event.value)) {
                app.alert("The string '"+event.value+"' is not a valid email address.");
                event.rc = false; // do not accept the change of the value
            }
        };
    </rx:pdf-javascript>

    <fo:layout-master-set>
        <fo:simple-page-master master-name="all-pages">
            <fo:region-body region-name="xsl-region-body" margin=".5in"/>
        </fo:simple-page-master>
    </fo:layout-master-set>
    <fo:page-sequence master-reference="all-pages">
        <fo:flow flow-name="xsl-region-body">
            <fo:block>email address:
                <fo:inline>
                    <rx:pdf-form-field name="email_address"
                        js-validate="v_email();"
                        alt-description="email"
                    >
                        <rx:pdf-form-field-text text="you@example.com"/>
                    </rx:pdf-form-field>
                    <fo:leader leader-length="5in"/>
                </fo:inline>
            </fo:block>
        </fo:flow>
    </fo:page-sequence>
</fo:root>
At most one element <rx:pdf-javascript> is allowed, it may not contain nested elements, and it is only allowed inside <fo:root> before any other FO elements.
Starting from version 4.18, IREn additionally provides various Javascript hooks for various PDF objects listed below. Although support for PDF Forms is licensed separately, generic support for Javascript hooks and <rx:pdf-javascript> does not require a special license key.
**Table B.2. **
| attribute | definition |
|---|---|
<fo:root>:
| These attributes define scripts to be execute by the PDF reader when the respective events happen. They go transparently to The attributes The attribute |
<fo:simple-page-master>:
| These are hooks for events of a page coming into or out of the view in the PDF reader. They go transparently to <xep:page> and then to Page objects in PDF document for each page created with the page master where the attributes were set. |
<rx:pdf-form-field>:
| These are hooks for PDF Form Fields only. They define the code to be executed by the PDF reader when a field loses or receives focus, when a mouse button is pressed or released in the field area, and when the mouse pointer enters or exits the field area, respectively. |
B.20. Multimedia features
Starting from version 4.17, IREn is able to produce PDF documents with multimedia objects.
The multimedia features are only supported in the PDF generator, and only if the PDF_VERSION option is set to 1.5 or higher. IREn supports all media formats recommended in PDF Reference, version 1.5.
Notes on SMIL media support:
-
IREn supports SMIL 2.0 version.
-
Starting from version 4.18,
content-typeattribute is required only for SMIL media format. -
For an SMIL media to be processed, it must have defined internal layout. If layout specified as
<topLayout>elements list, to determine the media box processed the first element. -
SMIL media layout
heightandwidthcan be expressed in the following units: px, pc, pt, cm, mm, in. Other unit identifiers are not supported.. -
If media object type embedded in SMIL is not supported by IREn, but media embedding is forced, it is being treated as plain text.
The new extension element <media-object> is a special inline element for including multimedia into XSL FO. This element exists both in 'rx:' and in 'xep:' namespaces, so media can be defined in XSL FO documents or in IREn Intermediate Format documents.
An <rx:media-object> may be placed in <fo:block> or <fo:inline>.
The source media is specified by the src attribute whose value is a URI. IREn handles HTTP, FTP, data and filesystem resource locators in URIs. An unqualified URI is treated as a path to a file in the local file system; if the path is relative, it is calculated from the location of the source XSL FO document.
Attribute content-type specifies media MIME type.
The attribute embed specifies whether the media should be embedded in a generated document (default value: 'true')
The attribute extraction-policy is a string indicating the circumstances under which it is acceptable to write a temporary file in order to play a media clip (default value: 'tempaccess'). For more details see PDF Reference.
The attribute show-controls specifies whether playing controls should be visible (default value: 'false')
Note: For SWF files the value of
show-controlsattribute is ignored. SWF file itself defines whether playing control should be visible.
The attribute play-mode specifies the play mode for playing movie. Possible values:
-
'once' - play once and stop;
-
'continuously' - play repeatedly from beginning to end until stopped;
-
a positive float that specifies the number of times to replay.
Default value is '1.0'
Note: If overriden in file,
play-modeattribute may not affect the SWF file playing.
The attribute volume specifies audio volume level. Possible values:
-
'silent' - 0% (mute);
-
'x-soft' - 0% (mute);
-
'soft' - 25%;
-
'medium' - 50%;
-
'loud' - 75%;
-
'x-loud' - 100%;
-
a positive integer that specifies the desired volume level as a percentage of recorded volume level.
Default value is '100%'
The attributeduration specifies the duration of the movie segment to be played. Possible values:
-
'intrinsic' - the duration is the intrinsic duration of the associated media;
-
'infinity' - the duration is infinity;
-
a positive float that specifie the number of seconds in the time span.
Default value is 'intrinsic'
The source poster is specified by the poster attribute whose value is a URI. Attribute poster-content-type specifies poster image MIME type.
The following DTD defines the extension element and attributes.
<!ENTITY % basic-inlines
  "...
  rx:media-object">

<!ENTITY % media-properties
  " embed  ( false | true ) #IMPLIED
  | alt CDATA #IMPLIED
  | extraction-policy ( tempaccess | tempnever | tempextract
                      | tempalways ) #IMPLIED
  | show-controls ( true|false ) #IMPLIED
  | play-mode CDATA #IMPLIED
  | volume CDATA #IMPLIED
  | duration CDATA #IMPLIED
  | poster CDATA #IMPLIED
  | poster-content-type CDATA #IMPLIED"
  >

<!ELEMENT rx:media-object EMPTY>

<!ATTLIST rx:media-object
  %media-properties;
  id  CDATA  #IMPLIED
  content-type  CDATA  #IMPLIED
  content-height  CDATA  #IMPLIED
  content-width  CDATA  #IMPLIED
  src  CDATA  #REQUIRED
  scaling  ( uniform | non-uniform | inherit )  #IMPLIED
  scaling-method  ( auto | integer-pixels
                  | resample-any-method | inherit )  #IMPLIED>
For further details on <xep:media-object> see Appendix F.
B.21. Rich Media
Starting from version 4.19, IREn is able to produce PDF documents with Rich Media Objects. This feature is controlled by a special license key file.
The RMO are only supported in the PDF generator, only if the PDF_VERSION option is set to 1.7 or higher (currently only SWF rich media format is supported). Design and Implementation of Rich Media Objects in IREn are based on PDF Specification version 1.7, Extension Level 3.
The new extension element <rich-media-object> with it's descendants allows the user to produce PDF files with interactive and parameterized Flash objects. This element and it's descendants exist both in 'rx:' and in 'xep:' namespaces.
In XSL FO the element <rx:rich-media-object> behaves the same way as multimedia and images.
The following DTD defines the extension elements and attributes for XSL FO:
<!ELEMENT rx:rich-media-object
        ((flash-var | rich-media-resource)*)>

<!ATTLIST rich-media-object
  id  CDATA  #IMPLIED
  content-type  CDATA  #IMPLIED
  content-height  CDATA  #IMPLIED
  content-width  CDATA  #IMPLIED
  name CDATA #REQUIRED
  src CDATA #REQUIRED
  scaling  ( uniform | non-uniform | inherit )  #IMPLIED
  scaling-method  ( auto | integer-pixels
                  | resample-any-method | inherit )  #IMPLIED>
  poster CDATA #IMPLIED
  poster-content-type CDATA #IMPLIED
  transparency ( true | false ) #IMPLIED
  activate-condition (page_visible
                     | page_open | explicit_activation) #IMPLIED
  deactivate-condition (page_invisible | page_close
                       | explicit_deactivation) #IMPLIED>

<!ELEMENT rx:flash-var (#PCDATA)>
<!ATTLIST rx:flash-var
  name CDATA #REQUIRED
  value CDATA #IMPLIED>

<!ELEMENT rx:rich-media-resource (#PCDATA)>
<!ATTLIST rx:rich-media-resource
  name CDATA #REQUIRED
  src CDATA #IMPLIED>
The following DTD defines the extension elements and attributes for XEPOUT:
<!ELEMENT rich-media-object
       (poster? | (flash-var | rich-media-resource)*)>
<!ATTLIST rich-media-object
  name CDATA #REQUIRED
  src CDATA #REQUIRED
  type CDATA #IMPLIED
  x-from CDATA #REQUIRED
  y-from CDATA #REQUIRED
  scale-x CDATA #REQUIRED
  scale-y CDATA #REQUIRED
  transparency ( true|false ) #IMPLIED
  activate-condition (page_visible
                     | page_open | explicit_activation) #IMPLIED
  deactivate-condition (page_invisible
                       | page_close | explicit_deactivation) #IMPLIED>

<!ELEMENT poster EMPTY>
<!ATTLIST poster
  src CDATA #REQUIRED
  type CDATA #IMPLIED
  x-from CDATA #REQUIRED
  y-from CDATA #REQUIRED
  scale-x CDATA #REQUIRED
  scale-y CDATA #REQUIRED>

<!ELEMENT flash-var EMPTY>
<!ATTLIST flash-var
  name CDATA #REQUIRED
  value CDATA #IMPLIED        (Either @value, or @content, not both.
  content CDATA #IMPLIED>      @content must contain base64-encoded bytes
                              of what was inside the element in XSL FO file)

<!ELEMENT rich-media-resource EMPTY>
<!ATTLIST rich-media-resource
  name CDATA #REQUIRED
  src CDATA #IMPLIED>
The transparency attribute indicates whether the page content is displayed through the transparent areas of the rich media content (where the alpha value is less than 1.0). If true, the rich media artwork is composited over the page content using an alpha channel. If false, the rich media artwork is drawn over an opaque background prior to composition over the page content.
The activate-condition/deactivate-condition attributes specify the animation style when the annotation is activated/deactivated.
The activate-condition attribute can have 3 possible values:
-
explicit_activation- the annotation is explicitly activated by a user action; -
page_open- the annotation is activated as soon as the page that contains the annotation receives focus as the current page; -
page_visible- the annotation is activated as soon as any part of the page that contains the annotation becomes visible. One example is in a multiple-page presentation. Only one page is the current page although several are visible.
The deactivate-condition can have 3 possible values:
-
explicit_deactivation- the annotation is explicitly deactivated by a user action; -
page_close- the annotation is deactivated as soon as the page that contains the annotation loses focus as the current page; -
page_invisible- the annotation is deactivated as soon as the entire page that contains the annotation is no longer visible.
Here is an example of Rich Media Object:
<?xml version="1.0" encoding="utf-8"?>
<!DOCTYPE root [
  <!ENTITY Column3d.xml.content SYSTEM "Column3d.xml">
]>
<fo:root xmlns:fo="http://www.w3.org/1999/XSL/Format"
      xmlns:rx="http://www.renderx.com/XSL/Extensions">
  <fo:layout-master-set>
    <fo:simple-page-master master-name="p">
      <fo:region-body region-name="xsl-region-body" margin="1in" />
    </fo:simple-page-master>
  </fo:layout-master-set>

  <fo:page-sequence master-reference="p">
    <fo:flow flow-name="xsl-region-body">
      <fo:block background-color="#9999cc" padding="10pt">
        This is Column3d.pdf.
        It has been made by XEP using Column3d.xml (pointed as DATA)
        and Column3D.swf. Both sources are from FusionCharts tutorial.
      <fo:block text-align="center" text-align-last="center">
  <rx:rich-media-object name="MyColumn3dFlash"
                       src="url('./Fusion/Column3D.swf')">
    <rx:flash-var name="someVar">some content for a var that
      may or may not be XML at all</rx:flash-var>
    <rx:flash-var name="dataURL" value="resource.column3d.xml"/>
    <rx:rich-media-resource name="resource.column3d.xml">
      &Column3d.xml.content;
    </rx:rich-media-resource>
    <rx:rich-media-resource name="another.resource"
                       src="url('http://test.com/dialog.jpg')"/>
  </rx:rich-media-object>
      </fo:block>
      </fo:block>
    </fo:flow>
  </fo:page-sequence>
</fo:root>
Column3d.xml:
<chart caption='Weekly Sales Summary'
   xAxisName='Week' yAxisName='Sales' numberPrefix='$'>
    <set label='Week 1' value='14400' />
    <set label='Week 2' value='19600' />
    <set label='Week 3' value='24000' />
    <set label='Week 4' value='15700' />
</chart>
Column3d.xml is the initial data to be used by the Flash file Column3D.swf.
Note: The usage of XML file with the help of DTD and entities as shown above is used for convenience, and it is equivalent to plain text insertion of the data into XSL FO document.
Sample code in XEPOUT:
...
<xep:rich-media-object name="MyColumn3dFlash" src="<abs_url_to_Column3D.swf>"
                       type="application/x-shockwave-flash"
                       x-from="168000" y-from="499550"
                       scale-x="1.0" scale-y="1.0">
  <xep:poster src="<DEFAULT_POSTER>" type="image/svg+xml" role="Poster image"
                       x-from="168000" y-from="499550"
                       scale-x="1.0" scale-y="1.0"/>
  <xep:flash-var name="someVar" content="wC20aSaN...<base64-encoded
                       content of that var>...8N+xweW5zD9"/>
  <xep:flash-var name="dataURL" value="resource.column3d.xml"/>
  <xep:rich-media-resource name="resource.column3d.xml"
                              content="wC20aSaN...<base64-
                              encoded Column3d.xml>...8N+xweW5zD9"/>
  <xep:rich-media-resource name="another.resource"
                              src="url('http://test.com/dialog.jpg')"/>
</xep:rich-media-object>
B.21.1. FlashVars
Using FlashVars allows to pass data or variables from PDF document to a Flash movie. Variables passed via FlashVars will go into the _root level of the Flash movie when first instantiated. All variables are created before the first frame of the SWF is played. The format of the string is a set of name=value combinations separated by &.
The new <rx:flash-var> element presents one of such a name=value pair.The value attribute is optional. It holds a simple string value if present. Otherwise the element's content is used as the value of this Flash variable.
FlashVars limitations:
-
The size limit of a FlashVars file is 64K (more than 65,000 bytes or between 32,500 to 65,000 characters, depending on the encoding).
-
Only letters, underline, and numbers can be used in the variable names.
-
A variable name must not start with a number (for example:
1messageis an invalid variable name because it starts with a number; whereasmessage1is a valid variable name). Flash will certainly reject or get confused if a variable name that starts with a number or other special characters is used - except underlines (ie:_message, and_1messageare valid names). -
A variable name should not contain any
spacecharacters (ie:my messageis an invalid name,my_messageis a valid name).
B.21.2. Rich Media Resources
Rich Media Resources are resources used by SWF. They can be .fla files with defined Flash variables inside, XML config, images, etc.
The new <rich-media-resource> element holds URI reference to the Rich Media Resource. The src attribute is optional. If it is absent, the element's content is used as the content of the resource in PDF.
B.22. PDF Note Annotations
Starting from version 4.19, IREn is able to produce PDF documents with note annotations.
The new extension element <pdf-comment> with it's descendants describes a single note annotation. This element and it's descendants exist both in 'rx:' and 'xep:' namespaces, so one may define comment in XSL FO documents or in IREn Intermediate Format documents.
In XSL FO the element <rx:pdf-comment> is allowed as a direct child of <fo:inline>, <fo:block> or <fo:block-container> and does not affect the actual document flow.
In XEPOUT the element <xep:pdf-comment> additionally wears mandatory positioning attributes x-from, y-from, x-till, y-till. Positioning is usually calculated by IREn core during the rendering process, but may be altered in XEPOUT by the user. The color attribute is transformed into <xep:color> child element.
The following DTD defines the extension elements and attributes. Namespaces are skipped, which means that both 'rx:' and 'xep:' apply. In XEPOUT the comments look pretty much the same, with some differences.
<!ENTITY % comments
  " pdf-sticky-note
  | pdf-file-attachment">

<!ELEMENT pdf-comment (%comments;)>
   <!-- just one particular comment! -->
<!ATTLIST pdf-comment
  content CDATA #IMPLIED
  title CDATA #REQUIRED
  color CDATA #IMPLIED
  opacity CDATA #IMPLIED>

<!ELEMENT pdf-sticky-note EMPTY>
<!ATTLIST rx:pdf-sticky-note
  icon-type ( comment | key | note | help | newparagraph
                      | paragraph | insert ) #IMPLIED
  open ( false | true ) #IMPLIED>

<!ELEMENT pdf-file-attachment EMPTY>
<!ATTLIST pdf-file-attachment
  src CDATA #REQUIRED
  filename CDATA #REQUIRED
  icon-type ( graph | pushpin | paperclip | tag ) #IMPLIED>
opacity attribute value is an positive integer that specifies an opacity level of the icon appearance in the PDF file. Default value of the attribute is '100%' (and 1.0 in XEPOUT).
Note: The following Annotation Flags are set on the PDF note annotations by IREn: 'Print', 'NoZoom', 'NoRotate'. However, in addition to 'Print' flag setting, user should make settings in Acrobat Reader to print comments. This feature is not available in Adobe Reader 9, so the flag has been ignored by the viewer.
B.22.1. PDF/A support
Text Annotations (i.e. "sticky notes") are allowed in PDF/A standard. However, opacity property was implemented in PDF 1.4. So, IREn ignores the property, if PDF version < 1.4.
FileAttachment Annotations are not allowed in PDF/A standard. In case of PDF/A, IREn ignores this feature.
B.23. Overprint
Starting from version 4.19, IREn provides an extension attribute rx:overprint with values "true" and "false" (default). This inheritable attribute controls whether overprining is turned on or off for particular drawing commands in Postscript (true setoverprint) and PDF (/OP true).
This attribute is allowed and supported in FO wherever color and background-color attributes are allowed.
In IREn Intermediate Format this flag appears as attribute overprint on all <xep:*-color> elements.
B.24. Barcodes
Starting from version 4.29, IREn provides a fast and convenient way to use barcodes in XSL-FO documents via RenderX extension <rx:barcode>. Based on specified barcode type and its data value, IREn generates a corresponding barcode as SVG graphic object.
IREn supports following barcode types:
-
1D barcodes: CODABAR, Code 128, Code 39, Code 93, EAN-8, EAN-13, ITF, UPC-A, UPC-E;
-
2D barcodes: QRCode, Aztec, Data Matrix, PDF417.
Barcode generation requires at least barcode type specified via type attribute and barcode data which can be specified via data attribute or via descendants of <rx:barcode> element including character descendants. The latter allows using formatting objects for specifying barcode data, which is especially useful for including page numbers in barcode date, e.g. <fo:page-number> for current page, <fo:page-number-citation> or <fo:page-number-citation-last> for the last page or any other page of interest. The following attributes on <rx:barcode> element control barcode generation:
-
type(enumeration, required) The type of barcode set as string. Required, case-sensitive, note the underscore naming convention. Can be one of the following:AZTEC,QR_CODE,DATA_MATRIX,CODABAR,CODE_128,CODE_39,CODE_93,EAN_13,EAN_8,ITF,PDF_417,UPC_A,UPC_E -
dataThe value to encode with the barcode. Required if the value is not specified by<rx:barcode>element's descendants (character data and/or formatting object descendants).Note: Can be used together with
<rx:barcode>element's descendants for variable length barcode types (whose length vary depending on its data like Code 39). If<rx:barcode>element has bothdataattribute and descendants including character data and child formatting objects like<fo:page-number>and<fo:page-number-citation-last>which will be resolved by formatter as text and contribute to<rx:barcode>element character data,dataattribute value will be used for calculating barcode length and therefore define space allocated for barcode by formatter, but barcode image placed in the document will contain the value specified by<rx:barcode>element's descendants. Usingdataattribute in addition to character and formatting object descendants provide a way to manually notify formatter of barcode data length because formatter must allocate space for barcode image before page references are resolved. Ex:<rx:barcode type="CODE_39" data="Page 000 of 000" format="001"> Page <fo:page-number /> of <fo:page-number-citation-last ref-id="pageSeqID"/> </rx:barcode> -
formatControls page number conversion into a string form for<fo:page-number>,<fo:page-number-citation>and<fo:page-number-citation-last>formatting objects. Works in the same way as<format>attribute specified on<fo:page-sequence>but for<rx:barcode>element's descendants. -
barcode-heightHeight of the underlying 1D barcode block in millimeters (mm). Optional.Note: This parameter make sense only for 1D barcodes. For 2D barcodes, see the section called “Sizes and Dimensions” below.
-
error-correctionThe algorithm of error correction, specific to the chosentype. Optional. The possible values are:-
for
QR_CODE-type barcodes, an 1-alpha value that stands for the percentage of correction data:-
Lfor7%correction; -
Mfor15%correction; -
Qfor25%correction; -
Hfor30%correction.
-
-
for
AZTEC-type barcodes, a numeric value specifying a minimal percentage of error correction words, must be>=25; -
for
PDF417-type barcodes, a numeric value in range0...8.
-
-
data-encodingCharacter encoding fordata. Ifdatacontains non ASCII symbols,data-encodingshould be specified. In most cases it'll add Extended Channel Interpretation (ECI) to barcode data which will allow barcode reader to correctly interpret encoded data. We recommend usingUTF-8and for the Japanese language you may preferShift_JISbut you can specify any standard encoding of your own preference. Optional.Example:
<rx:barcode data-encoding="UTF-8" type="QR_CODE" data="กรุงเทพ มหานคร" /> <rx:barcode data-encoding="Shift_JIS" type="QR_CODE" data="ハローワール ド" /> -
All attributes applicable to
<fo:external-graphic>IREn generates barcodes as SVG and places them in document by wrapping in<fo:external-graphic>internally. For the convenience of understanding, you can imagine that each<rx:barcode>element is replaces by<fo:external-graphic>element containing SVG. All attributes specific to barcodes(describer above) are used for barcode generation while all other attributes are applied to<fo:external-graphic>element wrapping barcode SVG. Especially useful and notable attributes arecontent-widthandcontent-height. See the section called “Sizes and Dimensions” below.
Sizes and Dimensions
Visual appearance and dimensions play an important role in barcode readability. Scanning machines and software are accustomed to certain stroke widths and lengths, interleave, color, and overall dimensions. So it is not recommended to alter the visual appearance of barcodes unless specifying a custom size is inevitable (e.g., because of the lack of free place on the page).
Quiet zones and human-readable barcode data are included in generated svg only in the case of EAN-8 and EAN-13, for all other barcodes set quiet zones and human-readable text manually using standard xsl-fo means.
Default dimensions for various barcode types are as follows:
-
for
EAN-13, default height is25.93mmand width is37.29mm -
for
EAN-8, default height is21.31mmand width is26.73mm
By default IREn produces barcodes with 1.00 magnification factor. As barcodes are generated as svg, they can be scaled by standard XSL FO means to any size. Therefore, the default dimensions specified below are used to create svg and determine barcode dimensions in the document only if no content-width or content-height attribute is specified.
The default x-dimension for 1D barcodes is 0.33mm. For CODE 39 X-dimension is 0.25mm, the ratio between narrow and wide is 1:2. For CODE 93 and CODE 128 X-dimension is 0.19mm. The default barcode height (excluding EAN-13 and EAN-8, see above) is 13mm. Barcode height can be set to any required value via barcode-height attribute.
25.9mmEAN-*
Note: In case if a custom size is needed, one can specify the exact barcode size via
content-widthorcontent-heightattributes. The underlying barcode will fit the specified dimension, keeping it's standard aspect ratio.
In order to produce a barcode with a specific size, first set barcode-height to achieve desired width/height aspect ratio and then set content-width and/or content-height attribute. The barcode will scale to fit the smallest dimension.
For example to get a half-height EAN-13 barcode, set barcode-height``="13mm"
Barcodes can be scaled to fit any size, however one should remember that scaling them to less than 80% of their default size (recommended by specs) is strongly discouraged.
Example:
The following fragment of XSL-FO source document...
<fo:block>
  [...]
  <rx:barcode type="EAN_13" data="8711253001202"/>
  [...]
</fo:block>
...will be processed to generate the following SVG code:
<svg:svg xmlns:svg="http://www.w3.org/2000/svg" height="25.93mm" width="31.35mm">
  <desc>
    <barcode value="8711253001202" type="EAN-13"/>
  </desc>
<svg:text x="0" y="25.93mm">8</svg:text>
<svg:g transform="translate(3.63mm)">
  <svg:rect x="0.00mm" y="0" width="0.33mm" height="24.39mm" fill="black"/>
  <svg:rect x="0.66mm" y="0" width="0.33mm" height="24.39mm" fill="black"/>
  ...
  <svg:text x="26.07mm" y="25.93mm">0</svg:text>
  <svg:text x="28.380000000000003mm" y="25.93mm">2</svg:text>
</svg:g>
</svg:svg>
For more information about the compatibility with the AFP Barcode Architecture (BC:OCA), see also: Section 6.6.
The following DTD defines the Barcode extension element and attributes.
<!ELEMENT rx:barcode (#PCDATA | fo:page-number | fo:page-number-citation | fo:page-number-citation-last)*>
<!ATTLIST rx:barcode
  type ( AZTEC | QR_CODE | DATA_MATRIX | CODABAR
       | CODE_128 | CODE_39 | CODE_93 | EAN_13
       | EAN_8 | ITF | PDF_417 | UPC_A | UPC_E ) #REQUIRED
  data              CDATA  #IMPLIED
  content-width     CDATA  #IMPLIED
  content-height    CDATA  #IMPLIED
  barcode-height    CDATA  #IMPLIED
  error-correction  CDATA  #IMPLIED
  data-encoding     CDATA  #IMPLIED>
For further details on SVG compatibility, see Chapter 7.
B.25. Charts
 Starting from version 4.31, IREn provides with a way to add graphic charts to XSL-FO documents via RenderX extension element
 rx:chart. Based on specified chart source code and its data, IREn generates a corresponding visual representation as an SVG graphic object.
This section describes [JSChart](#charts-jschart) module responsible for this functionality as well as techniques of using JavaScript [chart generation library](#charts-genlib) of client's choice.
Since several terms used below have multiple meanings in I.T. industry, it could appear ambiguous to readers. The following section contains definitions for terms used here to describe the cross-technology approach used in [JSChart](#charts-jschart) module.
Glossary
-
JSChart module A Java module, part of IREn, responsible for processing [
<rx:chart>element](#charts-rxchart) and managing underlying [chart generation library](#charts-genlib). -
<rx:chart>element a custom XSL-FO element, part of source documents. -
Chart source code an HTML+JavaScript content that defines the chart values (data points) and its appearance. Inner content of [
rx:chartextension element](#charts-rxchart).See Also
<rx:chart>element. -
Chart source data See Chart source code.
-
Chart generation library A third-party library, developed in JavaScript, which is employed for actual rendering chart data to resulting SVG.
See Also Chart source code, Chart SVG.
-
Chart SVG an SVG data, result of the processing [chart data](#charts-sourcecode) by [chart generation library](#charts-genlib).
B.25.1. Overview
[rx:chart extension element](#charts-rxchart) contains chart definition in HTML or JavaScript format.
[JSChart](#charts-jschart) module processes [rx:chart element](#charts-rxchart) by loading HTML+JavaScript [chart data](#charts-sourcedata) in a browser environment, evaluating the JavaScript code, extracting [rendered chart](#charts-svg) generated by JavaScript code evaluation as a self-sufficient SVG, and finally forwarding it to IREn formatter core.
JSChart module has been tested with Node.js version 18.2.1.
Currently, JSChart module is tested and tuned with AnyChart and Chartist.js chart generation libraries, but a variety of other third-party JavaScript libraries can be used, either free or commercial. The only requirement for [chart generation library](#charts-genlib) is that its output should be drawn as SVG, not as HTML canvas.
B.25.2. Workflow
The workflow is as follows:
-
The user creates an HTML document with JavaScript that produces a desired chart. The user then verifies it by opening it in a regular Web browser (e.g. Chrome) to ensure it is working alone;
-
The user adds the [chart generating source code](#charts-sourcecode) to XSL-FO document via [
rx:chartextension element](#charts-rxchart) containing or referencing aforementioned HTML document; -
The user runs IREn to process the XSL-FO document;
-
During the pre-processing the XSL-FO document, IREn encounters the [
rx:chartextension element](#charts-rxchart) and invokes JSChart module. -
JSChart module starts (or uses the already-running) an instance of Node.js;
-
JSChart loads the HTML+JavaScript in the simulated browser environment;
-
The simulated browser environment invokes a JavaScript trigger method, which calls the [chart generation library](#charts-genlib), process the data, and render it into an SVG data;
-
JSChart extracts the [SVG data](#charts-svg) from the browser environment and forwards it to IREn;
-
IREn makes in-memory modification of the XSL-FO by replacing source [
rx:chartelement](#charts-rxchart) with thefo:external-graphicelement containing the chart SVG; -
IREn formats the document with the
fo:external-graphicelement.
B.25.3. Installing
This section assumes IREn is already installed and is able to run from the command line. See Chapter 4 for details.
This section assumes installing on Windows platform. If installing on Linux, Mac, and UNIX, make sure to change C:\Program Files\RenderX\ to the directory IREn has been installed on.
Install JSChart by executing the following command line:
java -cp "C:\Program Files\RenderX\XEP\lib\xep.jar" ^
    com.renderx.jschart.JSGate ^
    install "C:\Program Files\RenderX\XEP\lib\jschart"
The command above will perform JSChart installation to C:\Program Files\RenderX\XEP\lib\jschart directory.
XEP\lib\jschart is the default directory for JSChart files and IREn will expect them there.
If you have installed JSChart to a non-default folder, you will need to modify xep.xml configuration file and specify this other directory by adding an option:
<option name="JSCHART" value="lib/other_dir"/>
Note: The installation process requires the Internet access for downloading Node.js and its modules as the size of Node.js and its modules is inconvenient for including in IREn distribution package.
Note: Upon the first use, Windows Firewall may ask for the permission for Node.js to access the network.
Note: If IREn is invoked to try formatting a document with [
rx:chartelement](#charts-rxchart) prior to installing any JSChart library first, IREn will suggest installing it and will provide the command above with adjusted paths for your IREn installation.
B.25.4. Usage
Once installed and configured, [JSChart](#charts-jschart) extension enables IREn recognize and process FO documents that contain [rx:chart elements](#charts-rxchart).
Synopsis and Examples
Here's an example of defining a chart by specifying HTML document as character data of rx:chart element. HTML is XML-escaped by wrapping in a CDATA section.
The example below is also available as an attachment.
<fo:root xmlns:fo="http://www.w3.org/1999/XSL/Format"
   xmlns:rx="http://www.renderx.com/XSL/Extensions">
   <fo:layout-master-set>
      <fo:simple-page-master master-name="any-page"
         page-width="8.5in" page-height="11in">
         <fo:region-body region-name="xsl-region-body" margin=".2in" />
      </fo:simple-page-master>
   </fo:layout-master-set>
   <fo:page-sequence master-reference="any-page">
      <fo:flow flow-name="xsl-region-body">
         <fo:block>
<rx:chart>    ❶
<![CDATA[     ❷
<html>
<head>
  <script src="https://cdn.anychart.com/releases/v8/js/anychart-base.min.js">
     </script>
  <script src="https://cdn.anychart.com/releases/v8/js/anychart-ui.min.js">
     </script>
  <script src="https://cdn.anychart.com/releases/v8/js/anychart-exports.min.js">
     </script>
  <link href="https://cdn.anychart.com/releases/v8/css/anychart-ui.min.css"
     type="text/css" rel="stylesheet">
  <link href="https://cdn.anychart.com/releases/v8/fonts/css/anychart-font.min.css"
     type="text/css" rel="stylesheet">
</head>
<body>
  <div id="rx-chart"></div> ❸

  <script>                  ❹
    anychart.onDocumentReady(function () {
      var dataSet = anychart.data.set(getData());

      var firstSeriesData = dataSet.mapAs({ x: 0, value: 1 });
      var secondSeriesData = dataSet.mapAs({ x: 0, value: 2 });
      var thirdSeriesData = dataSet.mapAs({ x: 0, value: 3 });

      var chart = anychart.line();
      chart.padding([10, 20, 5, 20]);
      chart.title('Trend of Sales of the Most Popular Products of ACME Corp.');

      chart.yAxis().title('Number of Bottles Sold (thousands)');
      chart.xAxis().labels().padding(5);

      var firstSeries = chart.line(firstSeriesData);
      firstSeries.name('Brandy');

      var secondSeries = chart.line(secondSeriesData);
      secondSeries.name('Whiskey');

      var thirdSeries = chart.line(thirdSeriesData);
      thirdSeries.name('Tequila');

      chart.legend().enabled(true).fontSize(13).padding([0, 0, 10, 0]);

      chart.container('rx-chart');
      chart.draw();
    });

    function getData() {
      return [
        ['1986', 3.6, 2.3, 2.8, 11.5],
        ['1987', 7.1, 4.0, 4.1, 14.1],
        ['1988', 8.5, 6.2, 5.1, 17.5],
        ['1989', 9.2, 11.8, 6.5, 18.9],
        ['1990', 10.1, 13.0, 12.5, 20.8],
        ['1991', 11.6, 13.9, 18.0, 22.9],
        ['1992', 16.4, 18.0, 21.0, 25.2],
        ['1993', 18.0, 23.3, 20.3, 27.0],
        ['1994', 13.2, 24.7, 19.2, 26.5],
        ['1995', 12.0, 18.0, 14.4, 25.3],
        ['1996', 3.2, 15.1, 9.2, 23.4],
        ['1997', 4.1, 11.3, 5.9, 19.5],
        ['1998', 6.3, 14.2, 5.2, 17.8],
        ['1999', 9.4, 13.7, 4.7, 16.2],
        ['2000', 11.5, 9.9, 4.2, 15.4],
        ['2001', 13.5, 12.1, 1.2, 14.0],
        ['2002', 14.8, 13.5, 5.4, 12.5],
        ['2003', 16.6, 15.1, 6.3, 10.8],
        ['2004', 18.1, 17.9, 8.9, 8.9],
        ['2005', 17.0, 18.9, 10.1, 8.0],
        ['2006', 16.6, 20.3, 11.5, 6.2],
        ['2007', 14.1, 20.7, 12.2, 5.1],
        ['2008', 15.7, 21.6, 10, 3.7],
        ['2009', 12.0, 22.5, 8.9, 1.5]
      ];
    }
  </script>    ❺
</body>
</html>
]]>            ❻
</rx:chart>    ❼

         </fo:block>
      </fo:flow>
   </fo:page-sequence>
</fo:root>❶ ❼
The rx:chart extension element that contains chart source HTML+JavaScript.
Content wrapped in CDATA
Inner JavaScript code
A div placeholder where the rendered SVG chart will be placed at. Mind the id attribute as it must have a specific value.
Instead of wrapping in CDATA section, HTML can be XML-escaped by replacing all <, >, and & symbols with <, >, and &, respecively:
The example below is also available as an attachment.
<rx:chart> ❶
<html> ❷
<head>
<script
src="https://cdn.anychart.com/releases/v8/js/anychart-base.min.js">
</script>
[...]
<style type="text/css">
[...]
</style>
<script> ❸
anychart.onDocumentReady(function () {
[...]
chart.container('rx-chart');
chart.draw();
});
</script> ❹
</head>
<body>
<div id="rx-chart"></div> ❺
</body>
</html> ❻
</rx:chart> ❼❶ ❼
The rx:chart extension element that contains chart source HTML+JavaScript.
Content in XML-escaped form
Inner JavaScript code
A div placeholder where the rendered SVG chart will be placed at. Mind the id attribute as it must have a specific value.
JSChart allows separating JavaScript code from its HTML wrapper. In this case, rx:chart extension element may only contain JavaScript lines marked above. This also helps avoid large XML-escaped blocks.
Note: Some characters in JavaScript code also require being escaped, like
<for comparison operators if used, or the entire JavaScript block wrapped in a CDATA section.
The same example can be written as follows if the HTML content is stored separately in chartMin.html file (instead of the inline CDATA section as in the example above):
The example below is also available as an attachment.
<fo:root xmlns:fo="http://www.w3.org/1999/XSL/Format"
    xmlns:rx="http://www.renderx.com/XSL/Extensions">
  <fo:layout-master-set>
    <fo:simple-page-master master-name="any-page"
      page-width="8.5in" page-height="11in">
      <fo:region-body region-name="xsl-region-body" margin=".2in"/>
    </fo:simple-page-master>
  </fo:layout-master-set>
  <fo:page-sequence master-reference="any-page">
    <fo:flow flow-name="xsl-region-body">
      <fo:block>
        <rx:chart src="chartMin.html"/>         ❶
      </fo:block>
    </fo:flow>
  </fo:page-sequence>
</fo:root>❶
The rx:chart extension element that only contains a reference to a file that contains chart data.
See the following section Section B.25.5 for further information about how to customize the <rx:chart> element and its data.
External Examples
We at RenderX consider getting familiar with the Charts technology and libraries essential for producing effective content. For this purpose, we recommend to try rendering sample charts available online before writing your own for use with IREn.
A good library of examples can be found on source code from https://www.anychart.com/products/anychart/gallery/. These sample charts can be used with JSChart as is.
Note: AnyChart's samples place charts within
<div id="container">while for IREn we recommend to use<div id="rx-chart">. Using the former variant would not break the operation, but IREn would yield a warning. Change the value ofidattribute to get rid of the warning.
B.25.5. <rx:chart> element specification
The [rx:chart element](#charts-rxchart) is used within the XML-FO document. It defines [chart data](#charts-sourcedata). There are several ways to do so:
-
via
srcattribute specifying the URI to locate an external file with HTML/JavaScript; -
as character data of [
rx:chartelement](#charts-rxchart);- Either XML-escaped or wrapped in a CDATA:
-
Since HTML is not SGML-compatible and additionally both HTML and JavaScript code may contain characters that may break the XML structure (like < and >), XML-escaping of certain characters required;
-
code wrapped in a
CDATAallows bare XML-sensitive characters;
-
- With or without the wrapping HTML:
-
Specifying the entire HTML+JavaScript document is more self-sufficient but is also more verbose as it repeats the HTML part which is usually same across the multiple charts in a document;
-
A bare JavaScript data is more succinct but it requires the HTML part defined in a template file
defaultContext.htmland configured as defined in Section B.25.6 section;
-
- Either XML-escaped or wrapped in a CDATA:
Scope
Within XSL-FO, the [rx:chart element](#charts-rxchart) is allowed in the same context as fo:external-graphic, which means inline or block-level being enclosed in an fo:block. Any attributes applicable to fo:external-graphic can be applied to <rx:chart>, they will be propagated to <fo:external-graphic> element generated by FOPreprocessor wrapping [chart's SVG](#charts-svg) (probably your will need content-width and/or content-height attributes).
Children
The rx:chart element may not contain nested elements.
Attributes
-
src(string, optional) file name to locate an external file with HTML/JavaScript;Note: This attribute assumes
file://schema so it should only contain a file name. In other words, it is not a full-featured URI. -
debug(true|false, optional) if set totrue, [JSChart](#charts-jschart) will save [SVG](#charts-svg) to a file in the same folder as the source HTML (for example,src="chartMin.html"would make SVG saved tochartMin.svg). -
*(optional) Any attributes applicable to<fo:external-graphic>can be applied, too. They will be propagated to<fo:external-graphic>element that contains the generated SVG chart.
Content
Only character data.
The character data must contain the Chart Data as described in the beginning of Section B.25.5 section.
Within the HTML, the chart must be placed within a <div id="rx-chart"> container.
Data Escaping
Since HTML is not SGML-compatible, there are several ways to include it in an XSL-FO document as character data:
-
All content escaped, e.g. all
<,>, and&symbols must be replaced with<,>, and&, respecively; -
Entire content wrapped in a
CDATAsection as shown in the section called “Synopsis and Examples” section.
Note: some characters in JavaScript code also require being escaped, like
<for comparison operators if used, or the entire JavaScript block wrapped in aCDATAsection.
Processing the <rx:chart> element is a part of the preprocessing stage as defined in Section 2.1. Specified HTML+JavaScript is loaded in simulated browser environment and the chart generation code is run. In the case of specified JavaScript code only, the content of defaultContext.html file is loaded first and the specified chart generating JavaScript code is applied to form a full set of HTML+Javascript data needed for rendering the chart.
After the chart is generated, it is extracted as an SVG and the entire <rx:chart> element is replaced with <fo:external-graphic> element containing chart's SVG. Therefore, IREn core receives and formats the chart as an SVG wrapped in <fo:external-graphic>.
B.25.6. Configuring
Configuring Fonts
Ensure that IREn font configuration has all the fonts used by [chart generation library](#charts-genlib).
[JSChart](#charts-jschart) executes chart generation code in a simulated browser environment which has its own set of fonts. These fonts could be taken from the operating system or downloaded from the Internet. As a result, rendered chart is forwarded to IREn in the form of [SVG](#charts-svg), and font-family names is the only information IREn has about used fonts.
On the other hand, IREn has its own font configuration and therefore fonts used by chart generation library must be referenced in IREn font configuration by using exactly same names and reference equivalent TTF/OTF font library.
For example, AnyChart by default uses font-family="Verdana, Helvetica, Arial, sans-serif" for text elements. Verdana and Helvetica font libraries are shipped with IREn so it is configured to use them by default. On Windows systems, Arial is also available from C:/Windows/Fonts/ and so IREn is also configured to use it by default. If, however, your chart generation library uses different fonts, ensure they are properly configured in xep.xml.
See more at Section 5.1.4 section.
Configuring HTML Wrapper
Managing full HTML+JavaScript documents might appear inconvenient, especially considering the need of escaping it for XML.
IREn allows splitting the content in two parts:
-
HTML wrapper — usually, it is common for all charts and therefore stored in a separate file, and
-
JavaScript data specific to each particular chart, located directly within the XSL-FO document.
In this case, common HTML part for all charts can be specified in a defaultContext.html file located in JSChart directory (which is XEP\lib\jschart\defaultContext.html by default). It should contain references to a certain JavaScript charting library.
Note: There is no way to define two different HTML wrappers nor change the file name yet.
Specifying JavaScript code only is equivalent to specifying contents of defaultContext.html with addition of <script> element containing specified JS code wrapped in
window.onload = function() {
        //specified code
}
defaultContext.html should contain HTML structure with references to [chart generation library](#charts-genlib), other library resources, corporate stylesheets, etc and also the <div id="rx-chart"> container for the chart.
If IREn encounters <rx:chart> element that contains bare JavaScript only, IREn will execute specified JS code in the context of default JSChart's HTML.
defaultContext.html is loaded once at Node.js startup with every ${path_to_resource} being replaced with contents of the file with corresponding path. Then defaultContext.html is stored in RAM and is being used for creating contexts for evaluating user's JS code. This approach allows achieving the best performance by loading all chart generation library's resources once at Node.js startup and also can be used to add custom CSS to automatically set custom corporate styling to all generated charts.
By default, defaultContext.html is designed for use with Chartist.js library, but it can be easily modified for any other chart generation library.
For example, a minimal file for use with AnyChart can be:
<html>
<head>
  <script src="https://cdn.anychart.com/releases/v8/js/anychart-base.min.js">
     </script>
  <script src="https://cdn.anychart.com/releases/v8/js/anychart-ui.min.js">
     </script>
  <script src="https://cdn.anychart.com/releases/v8/js/anychart-exports.min.js">
     </script>
  <link href="https://cdn.anychart.com/releases/v8/css/anychart-ui.min.css"
     type="text/css" rel="stylesheet">
  <link href="https://cdn.anychart.com/releases/v8/fonts/css/anychart-font.min.css"
     type="text/css" rel="stylesheet">
  <style type="text/css">
    html,
    body,
    #rx-chart {
      width: 100%;
      height: 100%;
      margin: 0;
      padding: 0;
    }
  </style>
</head>
<body>
  <div id="rx-chart"></div>
</body>
</html>
Then in FO rx:chart can be used as follows:
<rx:chart content-width="4in">
  anychart.onDocumentReady(function () {
    // create data set on our data
    var dataSet = anychart.data.set(getData());

    var firstSeriesData = dataSet.mapAs({ x: 0, value: 1 });
    var secondSeriesData = dataSet.mapAs({ x: 0, value: 2 });
    var thirdSeriesData = dataSet.mapAs({ x: 0, value: 3 });

    var chart = anychart.line();
    chart.padding([10, 20, 5, 20]);

    chart.title('Trend of Sales of the Most Popular Products of ACME Corp.');

    chart.yAxis().title('Number of Bottles Sold (thousands)');
    chart.xAxis().labels().padding(5);

    var firstSeries = chart.line(firstSeriesData);
    firstSeries.name('Brandy');

    var secondSeries = chart.line(secondSeriesData);
    secondSeries.name('Whiskey');

    var thirdSeries = chart.line(thirdSeriesData);
    thirdSeries.name('Tequila');

    chart.legend().enabled(true).fontSize(13).padding([0, 0, 10, 0]);

    chart.container('rx-chart');
    chart.draw();
  });

  function getData() {
    return [
      ['1986', 3.6, 2.3, 2.8, 11.5],
      ['1987', 7.1, 4.0, 4.1, 14.1],
      ['1988', 8.5, 6.2, 5.1, 17.5],
      ['1989', 9.2, 11.8, 6.5, 18.9],
      ['1990', 10.1, 13.0, 12.5, 20.8],
      ['1991', 11.6, 13.9, 18.0, 22.9],
      ['1992', 16.4, 18.0, 21.0, 25.2],
      ['1993', 18.0, 23.3, 20.3, 27.0],
      ['1994', 13.2, 24.7, 19.2, 26.5],
      ['1995', 12.0, 18.0, 14.4, 25.3],
      ['1996', 3.2, 15.1, 9.2, 23.4],
      ['1997', 4.1, 11.3, 5.9, 19.5],
      ['1998', 6.3, 14.2, 5.2, 17.8],
      ['1999', 9.4, 13.7, 4.7, 16.2],
      ['2000', 11.5, 9.9, 4.2, 15.4],
      ['2001', 13.5, 12.1, 1.2, 14.0],
      ['2002', 14.8, 13.5, 5.4, 12.5],
      ['2003', 16.6, 15.1, 6.3, 10.8],
      ['2004', 18.1, 17.9, 8.9, 8.9],
      ['2005', 17.0, 18.9, 10.1, 8.0],
      ['2006', 16.6, 20.3, 11.5, 6.2],
      ['2007', 14.1, 20.7, 12.2, 5.1],
      ['2008', 15.7, 21.6, 10, 3.7],
      ['2009', 12.0, 22.5, 8.9, 1.5]
    ];
  }
</rx:chart>
Configuration Variables
-
com.renderx.JSCHARTdirectory where the chart generating library is installed.Default:
<XEP installation directory>\lib\jschart -
com.renderx.jschart.jsenvname of the library that wraps a headless Chrome.Values are either
"puppeteer"or"jsdom". -
com.renderx.jschart.levellog level for the com.renderx.jschart package; -
java.util.logging.config.filefull path to configuration file for the Logging module;
B.25.7. Debugging and Troubleshooting
Since rendering charts requires the orchestration of several independent software products, it may appear unclear what causes a problem. There are several points that help finding problems:
-
Developing a valid, working chart before involving RenderX IREn;
-
Checking the resulting SVG representation that comes from the chart rendering library to FO document;
-
Enabling logging in order to see messages yielded by IREn.
Authoring Valid HTML Charts
First, it is crucial to develop a valid, working chart before placing it into the XSL-FO document.
Generally, you would only need a modern Web browser for it.
Here are several tips on how to accomplish this:
The validity of the HTML document can be verified by opening that HTML with any modern Web Browser, it should render the chart and show it on screen.
To verify that the chart is placed in div id="rx-chart", open Developer Tools (Ctrl+Shift+I), activate element selection mode (Ctrl+Shift+C), click on any element of the chart, and verify that parent SVG is a child of div id="rx-chart". Alternatively, use Console in Developer Tools, execute document.getElementById("rx-chart") and verify that it contains the chart.
The validity of the JavaScript code should be verified by inserting the JS code wrapped in <script> in defaultContext.html and then opening resulting HTML in Web Browser.
Debugging with XEPOUT
rx:chart element has an optional debug attribute which can be used along with src attribute that specifies external HTML file location. If debug is set to true, JSChart will save SVG to an external file in the same folder as source HTML. (for the example below SVG produced by chartMin.html will be saved to chartMin.svg file).
<rx:chart src="chartMin.html" debug="true"/>
For further details, refer Section B.25.5 section.
Also, the chart's SVG provided by JSChart to IREn can be obtained by formatting to XEPOUT format. In XEPOUT file, the chart SVG is stored as xep:image element as data URL (Base64).
<xep:image src="data:image/svg+xml;base64,PHN2Z...
Decode it and inspect if needed.
Logging
For logging, JSChart module uses java.util.logging library.
By default, error and warning messages are directed to standard console. For fine-grained control over logging and for logging output redirection, use standard java.util.logging configuration approach:
Create (or edit existing) logger.properties file and pass it as java.util.logging.config.file JVM option. This can be done by adding
-Djava.util.logging.config.file=
  "C:\Program Files\RenderX\XEP\lib\jschart\logger.properties"
to IREn starting script before the classpath option.
It is done in the exact same way as specifying xep.xml so if you are not sure where to place JVM options search for
-Dcom.renderx.xep.CONFIG
and add
-Djava.util.logging.config.file
in the same way.
For detained logging FINE level is recommended.
FINER and ALL contains information about proxying.
FINE level includes information about each formatting request and Node.js stopping and starting;
FINER level additionally includes information about requests on :3000 and where they have been proxied;
ALL level additionally includes information about proxying threads starting and stopping
Default log level is INFO. Default message format consists of two lines per message and can make bypassed Node logs absolutely human unreadable.
logger.properties example, console output
# logger.properties example for printing JSChart detailed logs
#   to console
handlers=java.util.logging.ConsoleHandler
# log level for the "com.renderx.jschart" package
com.renderx.jschart.level=FINE
# Set the default logging level
java.util.logging.ConsoleHandler.level=FINE
# Set the default formatter
java.util.logging.ConsoleHandler.formatter=java.util.logging.SimpleFormatter
java.util.logging.SimpleFormatter.format=[%1$tF %1$tT] [%4$-7s] %5$s %n
logger.properties example, console and file output
# logger.properties example for printing JSChart detailed logs
#   to console and log file
# The following creates two handlers
handlers=java.util.logging.ConsoleHandler, java.util.logging.FileHandler
# log level for the "com.renderx.jschart" package
com.renderx.jschart.level=FINE
# Set the default logging level
java.util.logging.ConsoleHandler.level=FINE
java.util.logging.FileHandler.level=FINE
# Set the default formatter
java.util.logging.ConsoleHandler.formatter=java.util.logging.SimpleFormatter
java.util.logging.SimpleFormatter.format=[%1$tF %1$tT] [%4$-7s] %5$s %n
java.util.logging.FileHandler.formatter=java.util.logging.SimpleFormatter
# Specify the location and name of the log file
java.util.logging.FileHandler.pattern=/var/logs/renderx/jschart.log
B.25.8. Implementation and Technical details
JSChart module serves as a wrapper for all JavaScript-related operations and Node.js manager. Node.js managing includes starting Node.js on demand, monitoring its status, hot swapping Node.js instances and restarting Node.js for achieving high performance and long-term reliability.
When IREn encounters rx:chart element for the first time while formatting an FO document, IREn automatically starts two instances of Node.js and manages them throughout their lifecycle. IREn keeps them running until IREn's JVM is running.
Therefore, in a scenario when IREn is being run from command line to format a single document, it would start Node.js upon encountering the first rx:chart element and shutdown those Node.js when it finishes formatting the document.
In a scenario when IREn is being used via Cliser, Node.js instances are started upon encountering a rx:chart element for the first time (not at the Cliser startup), however upon the completion of formatting the first document, Node.js instances continue running until the corresponding Cliser (and the underlying IREn) stops.
As each Cliser runs in its own JVM and IREn starts two Node.js instances per JVM, the total amount of running Nodes can be calculated from JSChart config using the following rule: one Cliser port = one JVM, multiple occurrences of the same Cliser address and port = multiple threads in one JVM.
For executing JS, IREn relies on Node.js and Puppeteer library which in turn uses Chromium browser in headless mode.
JSChart uses simulated browser environment to execute user's JS code. By default, browser environment is created by Puppeteer library as it provides real browser environment and any JS library (including AnyChart) can be run in it with precisely reproducible result, just like in an actual browser. Not all JavaScript libraries, however, are that picky. For example, Chartist.js can be successfully run using environment created by jsdom library and provide at least twice the performance of evaluating the same JavaScript code via Puppeteer. Therefore, jsdom was not removed after switching to Puppeteer as a default.
Puppeteer mode
This is the default mode in which JSChart works.
Puppeteer library is actually a wrapper around headless Chrome and therefore any code running in Chrome can be run via Puppeteer with exactly the same result. Such approach does not grant the best performance, but it provides with the best compatibility. Originally, it was created for use with AnyChart since AnyChart has a lot of issues with everything related to non-standard usage like being run not in actual browser. Therefore, Puppeteer mode is as issue-proof as possible.
Puppeteer evaluates user's JS code and waits for SVG to be fully drawn by waiting for <svg> tag to appear in div id="rx-chart" container and then waiting for the SVG content and possible animation to settle down (not changing for 0.1 seconds). Therefore, the only requirement for the user's JS code is to create and place SVG in div id="rx-chart" container.
Before returning completed SVG to IREn, JSChart embeds styles from HTML to SVG as SVG will be taken out of HTML context but styling should persist and sets width and height explicitly on SVG top element to adress the issue described below.
Both AnyChart and Chartist.js set top width and height to 100% by default if they are not explicitly specified.
IREn does not support percentage values as top SVG width or height and will yield an error:
[error] com.renderx.graphics.ImageFormatException:
    com.renderx.svg.SVGParseException: Percentages are not supported
    in dimensions of a top-level 'svg' element
To address this issue, JSChart sets width and height to actual calculated values.
jsdom mode
To use jsdom instead of Puppeteer, modify xep.bat (or another script that runs IREn) by adding the following:
-Dcom.renderx.jschart.jsenv=jsdom
Currently, jsdom mode is tuned for working with Chartist.js library and for determining the end of chart drawing process it relies on created event triggered from Chartist.js. Therefore, call to chart generation function should be assigned to chartist variable so that JSChart were able to listen on events on this variable.
For convenience in writing your own code, see examples.
Note: Relying on events for determining the end of chat drawing is a necessary for achieving the best performance, however it leads JSChart code to being depended on a specific chart generation library (currently Chartist.js). On the other hand, this code be be easily modified for other libraries.
Note: One should keep in mind that not every JS library can be run in a browser environment created by jsdom; namely AnyChart.
For generating charts using jsdom, the Chartist library should be used.
Important notes for JS code:
-
When calling
Chartist.Line\Bar\Pie, the first parameter is container, so#rx-chartmust be used; -
Chart should be assigned to
chartistvariable; -
widthandheightoptions must be defined.Note: Do not omit semicolons! Or be ready to face "Unexpected token" errors. For example:
<rx:chart content-width="4in"
  description="↵           ❶
  var chartist = new Chartist.Line(↵
    '#rx-chart',↵
    { labels: ['Monday', 'Tuesday', 'Wednesday', 'Thursday', 'Friday'],↵
      series: [ [12, 9, 7, 8, 5], [2, 1, 3.5, 7, 3], [1, 3, 4, 5, 6] ] },↵
    { width: 600, height: 400});"/>❶
See more Chartist.js examples on http://gionkunz.github.io/chartist-js/examples.html
Working as a standalone independent micro service
Starting up a Node.js instance takes a considerable amount of time. This may introduce performance issues, depending on various scenarios of IREn instance's lifespan in a particular production environment.
In scenarios when IREn is run within a JVM that keeps running in memory (e.g. within Cliser), the underlying Node.js instance is being only started once, on the first need (a rendered document contains a Chart) and continues running as long as IREn runs within its JVM, so the performance is optimal.
There are, however, other scenarios when IREn exits after the processing, like from within the command line. In this case, every new IREn instance would have to start its own Node.js once needed, making the performance sub-optimal.
In order to achieve a better performance in such scenarios, JSChart can be started as an independent micro service which can be accessed during the rendering of subsequent XSL-FO documents that contain charts. This approach drastically reduces chart processing since it does not wait for a fresh instance of Node.js to start every time a document with charts is processed.
The micro service manages the underlying instance of Node.js and [chart generation library](#charts-genlib), serving document formatters' requests.
Warning:
This is an experimental feature. If you are interested in using it, fell free to do so. Please contact RenderX support if you have any questions, suggestions or issues.
To start the micro service, run the following command line (assuming running on Windows):
java -cp "C:\Program Files\RenderX\XEP\lib\xep.jar" ^
    com.renderx.jschart.JSGate ^
    "C:\Program Files\RenderX\XEP\lib\jschart" 3000
or with detailed logs (read about logging and logger.properties contents in the section called “Logging”):
java
    -Djava.util.logging.config.file=↵
    "C:\Program Files\RenderX\XEP\lib\jschart\logger.properties" ^
    -cp "C:\Program Files\RenderX\XEP\lib\xep.jar" ^
    com.renderx.jschart.JSGate ^
    "C:\Program Files\RenderX\XEP\lib\jschart" 3000
To make IREn call the standalone JSChart micro service (instead of processing chart locally), the <rx:chart> element in FO document should have service-url attribute specified with a valid URL pointing to the micro service running at. If specified, JSChart does not start a local instance of Node.js, but instead connect to a remote JSChart running as a standalone micro service at service-url, send the JS code there and wait for response containing a rendered chart.
Default port is 3000, e.g.:
<rx:chart service-url="http://localhost:3000">
Note: explicitly specifying the protocol
http://is mandatory; theHTTPSprotocol is not supported.
Anychart notes
JSChart requires SVG to be placed in div id="rx-chart" while AnyChart uses div id="container" in its examples. As a workaround to provide the convenience of experimenting with examples from AnyChart gallery https://www.anychart.com/products/anychart/gallery/, JSChart does the following:
if no #rx-chart is specified and AnyChart is being used with their default #container div container, JSChart will automatically rename #container to #rx-chart (and issue a warning). This way, examples from the gallery would work with no modification.
AnyChart may drop labels if it considers that there is not enough space for them. By default, Puppeteer simulates browser environment using window size of 800x600 pixels. It is quite small, and disappearing labels can be even seen on standard examples from AnyChart gallery. JSChart sets window size to 1920x1080, and this seems to be enough for charts produced for A4/Letter sized media. If you, however, target bigger media or high-DPI printing or encounter labels or some other element disappearing, try setting a bigger html body size (set it via CSS) and then scale the SVG in FO by using content-width and content-height attributes applied to <rx:chart>.
Chartist.js notes
A minimal JS code consists of a single chart drawing function call and assigning result to var chartist:
var chartist = new Chartist.Line('.ct-chart', chartData, options);
options parameter must contain width and height fields.
Chart appearance can be changed in two ways: by adding a custom CSS or by handlings events thrown by Chartist.js library.
From chartist author: “We keep a very strong separation of concerns for our library. Everything presentation related, should if possible, be done with CSS.”
To use custom CSS, start your chart generation code by adding a CSS to document with the following steps:
-
define a string variable with a desired CSS style;
-
create a style element;
-
add a textNode to style element based on previously defined variable containing a custom CSS;
-
append the style element to the document head.
For convenience, copy and modify the code below:
var css = `
/* setting style for horizontal labels */
.ct-label.ct-label.ct-horizontal {
position: fixed;
justify-content: flex-end;
text-align: right;
fill: blue;                        /* set font color */

/* the following won't work since
 *   XEP doesn't support transform-origin
 transform-origin: center; */

/* the following will work, but the transform-origin
 *   will correspond to "left top"; requires fix
 transform-box: fill-box; */

transform: rotate(-25deg);
}
`;
var head = document.getElementsByTagName('head')[0];
var s = document.createElement('style');
s.setAttribute('type', 'text/css');
s.appendChild(document.createTextNode(css));
head.appendChild(s);
Handling events
While generating a chart, Chartist.js throws events which can be caught and reacted upon to make changes to chart SVG. The event handler must be applied and configured after all other chart description code and after a call to chart generation function and assigning its result to var chartist.
Events thrown by Chartist.js contain internal Chartist.js data objects created while generating chart.
There is no proper documentation for these data objects, and achieving a desired result may only be done by trial and error.
Anyway, event handling code can be divided in two parts: writing if statement which filters data objects, and writing code changing data object.
Setting event handler is done by the following code:
.on('draw', function(data) {...});
One of the most useful attributes data.type can take 'label', 'point', 'line' arguments, and prabably other values. Also, it is possible to get objects class, for example this is the if condition for horizontal labels:
data.element.getNode().classList.contains('ct-horizontal')
var chartist =
  new Chartist.Line('.ct-chart', chartData, options)
  .on('draw', function(data) {
    if(data.type === 'label' &&
      // data.axis.units.dir == 'horizontal') {
      // the same as the line above but completely undocumented
      // and found via trial&error
      data.element.getNode().classList.contains('ct-horizontal')) {

      // output smth and read it in detailed logs
      // console.log(data.text)

      // add an attritute to an element
      data.element.attr({
        transform: 'translate(-10)'
      });

      // Draw something via Chartist API
      // and replace an element with it
      // (see examples on Chartist site)
      // data.element.replace(triangle);
    }
  });
Move whole graph (lines and points) along the X axis:
.on('draw', function(context){
    if (['point', 'line'].indexOf(context.type) !== -1) {
        context.element.attr({
            transform: 'translate(' + context.axisX.stepLength / 2 + ')'
        });
    }
});
Chartist.js code shipped with JSChart is a bit modified.
By default, Chartist.js wraps labels in SVG foreignObject to futher wrap labels in an HTML span. Before doing so, Chartist checks the JS script engine for supporting foreignObject's as follows (chartist.js:1957)
document.implementation.hasFeature(
  'http://www.w3.org/TR/SVG11/feature#' + feature, '1.1');
    // feature='Extensibility'
However, document.implementation.hasFeature has been deprecated long ago and currently, according to the specification, document.implementation.hasFeature(whatEverString) should return true regardless of the argument. jsdom respects this specification aspect.
Therefore, to get an SVG without foreignObject, Chartist source code must be modified (chartist.js:1957)
this.supportsForeignObject = false;
HTML span is very useful for placing labels in the center position. When wrapped in HTML's span, label centering is the default behaviour, but without them using plain SVG text there doesn't seem to be a good way for centering labels. Not so good approach is to move labels manually be it by CSS or events. Below is an example of moving labels by a hard-coded offset using events:
.on('draw', function(data) {
  if(data.type === 'label'
    && data.element.getNode().classList.contains('ct-horizontal')) {
    data.element.attr({
      transform: 'translate(100)'
    });
  }
});
Default chartist.css specifies font-size:.75rem; value for .ct-label. IREn, however, does not support rem units in SVG. To fix this, the corresponding value in rem units has been removed from chartist.css.
Chartist.js color palette
Chartist.js has a specific default color palette but it can be easily changed to anything preferred by user via CSS.
Color palette for all chart types (Line, Bar, Pie) can be changed by the following CSS:
.ct-series-a .ct-bar, .ct-series-a .ct-line,
.ct-series-a .ct-point, .ct-series-a .ct-slice-donut {
  stroke: #0CC162;
}
.ct-series-b .ct-bar, .ct-series-b .ct-line,
.ct-series-b .ct-point, .ct-series-b .ct-slice-donut {
  stroke: #BBBBBB;
}
Add .ct-series-c, .ct-series-d, .ct-series-e and so on in the same way.