
Chapter 7 of the VisualXSL User Guide
6. Using the VisualXSL Application
6. Using the VisualXSL Application
6.1. How to Create a New Project
Procedure 6.1. To create a new project:
-
Run a project in VisualXSL with one of the above-mentioned methods.
-
If the previous project loaded automatically on startup, press the New Project button on the toolbar, or select the File | New Project menu item, or press the Ctrl+N key combination.
-
To select the XML file (it must be a well-formed XML document), either use the File | Open Source XML menu item, or press the Ctrl+F key combination. After the XML file is successfully loaded, its schema is shown in the XML Tree View.
-
To set the required properties in Object Properties, click an empty space of the section in Layout and do as follows:
-
Specify the Pattern property in the property grid. The Pattern property should contain a valid XPath of an XML element.
Note: The XPath expression is case sensitive.
-
Set the BackgroundPath property value to the valid full path of the previously prepared PDF file (which contains the form that you want to fill with data from the XML). It can easily be done by clicking the
 button.
 -
You can also set an alternative value for the RasterizedPath property. Set it to the valid full path of a previously prepared raster file with a form you want to fill with data from the XML.
Note: Currently, the application supports the following raster image formats: PNG, TIFF, JPG, and GIF (for more details, see the RenderX IREn On-line Reference).
-
6.2. How to Create a Multi-Section Project
Procedure 6.2. To create a multi-section project:
-
Create a new project (see How to Create a New Project above).
-
Select an XML file either by using the File | Open Source XML menu item or by pressing Ctrl+F.
-
In the object properties, set the BackgroundPath property to a full path of the required multi-page PDF.
You can click the
button to use the open file dialog. After the PDF background is selected, the first section is rendered in the layout area and the full path to the rasterized version appears in the object properties in the RasterizedPath property. Also, the application creates a PDF for every section of the selected PDF, and produces rasterized versions of them. Rasterized files are generated from the multi-page PDF background file. For each page a separate PDF and PNG files are generated. Files are created in the project folder and named: PDF File-NameXXXX.pdfandPDF File-NameXXXX.png, whereXXXXis a section number starting from 0001. These files are set as the backgrounds for the corresponding pages.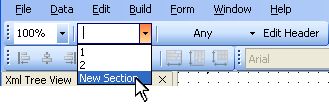
Figure 6.1. Adding a new section to the project
If you do not have a PDF file with a form, but you have a file in a supported graphics format such as PNG, TIFF, JPG, and GIF (for more details, see RenderX IREn On-line Reference), you may manually set its path to the RasterizedPath property.
-
Add and adjust the data fields for this section (see, How to Add Data Fields below).
-
When all data fields have been added and are properly adjusted, click the toolbar drop-down list with the active section number (see the figure 6.1 above).
The drop-down list shows the currently available section numbers, and at the bottom of the drop-down list there is a New Page item. Click this item if you need to add a new section to the project. Alternatively, you can use the Edit | Add section menu item or press the Alt+P key combination. To add a new section, you may also enter the next number of the last section's number.
-
To remove the currently selected section, use the Edit | Remove section menu command or the Alt+R key combination.
6.3. How to Add Data Fields
After the project is created, you can add, modify, or remove data fields.
Data field is a frame on the Layout. It is dynamically rendered in the resulting document by getting data from the XML data file.
Procedure 6.3. To add a new data field:
-
Select a node in the Xml Tree View. The data stored in this node is rendered in the resulting form.
-
Click the Add to Layout toolbar button to add a field with the selected XML node to the design layout. Alternatively, you can drag a selected tree node and drop it onto the layout. A new data field appears in the form layout. Or, you can drag an item by holding the right mouse button. In that case, after releasing the mouse button in the desired place on the layout, you can choose a data field type from the context menu.
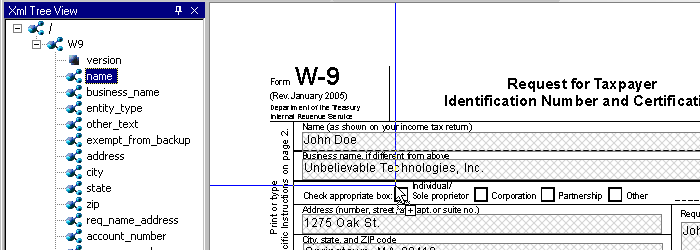
Figure 6.2. Dragging XML node onto the layout
-
You can now select the newly added frame by clicking it, and setting its desired position by dragging it over the layout.
-
A data field, when selected, has handles at the corners and at the middle of the sides. You change the location and size of the data field by dragging.
-
Additional properties can be modified for a selected data field in the Properties pane.
After all data fields are added and aligned, you can generate the XSL stylesheet and/or the resulting PDF document.
During the PDF rendering, fields are filled with data from the XML file. See the detailed properties description in the Data Fields and Properties chapter.
6.4. How to Fill In Preprinted Forms with Data
Procedure 6.4. To fill in preprinted forms with data fields:
-
Create a new project in VisualXSL.
-
Scan to a raster image of the preprinted form and set it as the background, or use an existing PDF.
-
Add data fields and all necessary pages.
-
Using Options pane, clear the Render form background check box.
-
Save the
.VXLfile. -
Generate your PDF with the data fields only, and print it on your preprinted form(s).
Note: To restore the background rendering in the destination document, check the Render Form Background check box when you are finished.
6.5. How to Use the Log Pane
The Log Pane traces the progress of the formatting. It contains all the messages from the IREn formatting engine. The messages are highlighted in the following way:
-
Errors – red;
-
Warnings – blue;
-
Other - black.
Some messages contain clickable links (warnings and errors related to incorrect XPath expressions in data fields). You can click those messages to go to the problematic data field.
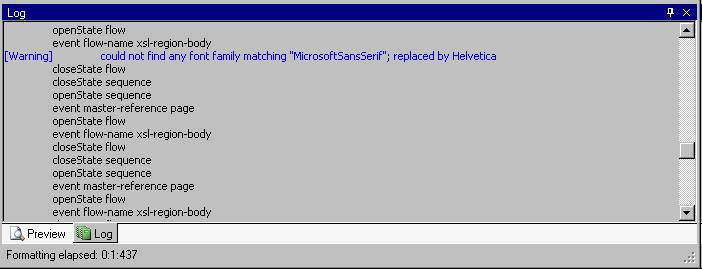
Figure 6.3. Warnings are blue in the log pane
It is recommended to look at the log after every document formatting. If the document is not generated successfully, the log can show the reason why.
6.6. How to Create PDF/PostScript Document with VisualXSL
After a project is created and all necessary data fields are placed on the layout, you can create a PDF or a PostScript document.
Procedure 6.5. To create a PDF/PostScript document:
-
Set Output Format toolbar icon or use the menu command Build | Set Output Format and select output format.
A File Save dialog box appears.
-
Click the Create Resulting Document toolbar icon or use the menu command Build | Create PDF.
A File Save dialog box appears.
-
Type in the file name for your document, set the desired document format (PDF or PostScript), and click OK.
Note: The application automatically rasterizes PDFs into an image when PostScript files are generated and a PDF file is set as the background for the project. This raster image is used as the background in the document.
Generation of the document can take some time, depending on the number of pages and the PDF background form's complexity.
Note: If your XML file contains a large number of records, you may get Not enough memory to format error. To fix this issue, increase Java memory settings (
-Xmsand–Xmxkeys) forCliser Service(a part of XEPWin package used by VisualXSL). For details see the CliserService.exe.config. file installed in the assumed location ofC:\Program Files\ RenderX\XEPWin folder.However, if the number of pages is more than this setting can handle, see below How to Create Large Documents Faster by Using RenderX VDPMil for the solution.
6.7. How to Create Large Documents Faster by Using VDPMill Directly
Creating documents with VisualXSL is acceptable if you need only to generate a small number of pages of a simple form (1-100 pages). However if you need to generate thousands of pages of a document, it is much faster to use RenderX VDPMill directly.
VDPMill is a complete solution with very high performance rendering of both large print files as well as singular large reports.
VDPMill can generate very large batch print files – hundreds of thousands of pages in a single file. Through the use of a multi-threaded formatting grid for documents, the components of this print file can be formatted simultaneously to meet any performance demands. The Formatter layer administrative tools allow the user to add/remove server connections from the grid so all that is required to increase performance is to add additional RenderX IREn server threads. The Formatter automatically balances the load across the new server threads. The Customizer is fully extendible, allowing the user to modify the print stream as desired before generation of output. This eliminates the need for custom PDF, PostScript and AFP parsers or concatenations. And using the multi-threaded Generator, VDPMill can produce simultaneous output documents from the same internal document stream, eliminating the need and inherent deficiencies of trying to convert one output format to another. For example, the user can produce one large batch of invoices as a PostScript or AFP file for print and selected invoices in that batch as PDF or PDF Form for electronic presentment or e-mail.
VDPMill is the perfect application for all your high performance print and large report production, and dynamic and interactive PDF Forms.
For information on RenderX VDPMill, contact RenderX Sales by calling +1.650.327.1000 or via email at sales@renderx.com
6.8. How to Use the Command Line Interface
VisualXSL has a command line interface that gives access to the application functionality from the Windows console.
The syntax to use is:
VisualXSL.exe <VisualXSLProject.vxl> <SourceXml.xml> <ResultingFile.pdf | ResultingFile.ps>[options]
where
-
<VisualXSLProject.vxl>is the full path to a VisualXSL application previously designed project file. -
<SourceXml.xml>is the full path to the source XML file containing data to be used in the transformation. -
<ResultingFile.pdf | ResultingFile.ps>is the full path to the resulting PDF or PostScript file name.Note: If the path contains spaces, it should be enclosed with double quotes.
The [options] is one of the followings:
-?- displays a message box with the command line syntax help.
-l<FULLPATH>- sets the log file name to store messages of the formatting process, where<FULLPATH>is a file name with the full path.
-r<NUMBER>– sets the number of the records to be extracted from the XML file to perform generation of the document, where<NUMBER>equals the expected number of records.
Example:
The following command line shows the feature in action:
        VisualXSL.exe "%ALLUSERSPROFILE%\Documents\VisualXSL
        Projects\Samples\W9\W9.vxl" "%ALLUSERSPROFILE%\Documents\VisualXSL
        Projects\Samples\W9src.xml" "%ALLUSERSPROFILE%\Documents\VisualXSL
        Projects\Samples\W9\W9.pdf" –l"%ALLUSERSPROFILE%\Documents\VisualXSL
        Projects\Samples\W9\W9.log" –r5
Note:
%ALLUSERSPROFILE%is a Windows system variable that contains the path to the user'sDocumentsfolder.
This example uses the W9.vxl sample project file with only first five records from W9src.xml to produce W9.pdf, in the ..\ All Users\Documents\VisualXSL Project\Samples\W9\ folder, and log all the events to W9.log file located in the same folder.
Note: In Windows Explorer "Documents" folder may be shown as "Shared Documents".
6.9. How to Add a Table Object
You can add a table object either by using the Data | Add Table menu command or by clicking the Add Table toolbar icon or right click on XML tree view and select Add Table.
To edit a table double-click on it. You can also select it and click the Edit | Edit Table menu command or right-click the table and for the context menu click the Edit Table command. The Table Builder opens and Table Builder's toolbar is added, where you can perform the following actions:
-

Add a table column. -

Add a table row. -

Delete a table column. -

Delete a table row. -

Delete the content of a cell. -

Add or delete a table header. -

Add or delete a table footer.
For more detailed information about these actions see Table section.
A table, when selected, has handles at the corners and at the middle of the sides. You change the location and size of a table by dragging.
In the Properties pane, you can set the properties of a table, such as:
-
BorderColor
-
Appearance -
Border -
BorderColor
-
-
Border Style
-
Appearance -
Border -
BorderStyle
-
-
Border Width
-
Appearance -
Border -
BorderWidth
-
For more detailed information about Table Builder see Table section.
6.10. How to Edit a Field Pattern
To see if editing a field pattern is currently enabled, look in the Properties pane's Expression | Pattern property. If this field is disabled, the field pattern editing is not currently enabled.
To enable the field pattern editing, go to the Options pane's XPath Editing | Allow Changes to Pattern Property and select the check box. The Expression | Pattern field is now available.
For example, let's concatenate the first name field and the last name field to produce the full name. Assume that the parent node is parent_name. Assume that the two name fields are: first_name, last_name. Then the XPath expression will be: concat(parent_name/first_name, ' ', parent_name/last_name)
6.11. How to Create Dynamic Templates
VisualXSL supports a mixture of static and dynamic templates. Dynamic templates can be created in any project, whether it was defined as Dynamic Document (in the New Project dialog box) or as a Form.
The default template in a dynamic document is the Any template.
To create additional templates for the project, click the Choose Section Template button. From the drop-down list, select either Only, First, Last, or Any. If the template does not exist, it is created. This template is the current template for the project. That is, this button can also be used to select the current template.
Note: For more information, see the Extensible Stylesheet Language (XSL) web site, under the "page-position" paragraph.
VisualXSL knows how many sections are in the project and assigns the templates according to the following rules.
For a single-section dynamic document, the Only template is used if it exists, otherwise the Any template is used.
For a multi-section dynamic document:
-
The
Firsttemplate is used for the first section if this template exists, otherwise theAnytemplate is used. -
The
Lasttemplate is used for the last section if this template exists, otherwise theAnytemplate is used. -
If there are any intermediate sections (that is, other than the first and the last sections), the
Anytemplate is used.
6.12. How to use JavaScript in PDF Forms
VisualXSL 2.3 and higher support JavaScript for PDF Forms. There are three types of JavaScripts for a document: JavaScript for a frame, JavaScript for a page and JavaScript for the hole document.
Procedure 6.6. To write JavaScript for a frame
-
Open/Create a VisualXSL project
-
Add a Text Frame
-
Navigate to Properties pane and set Threat as Field property to
TrueNote: JavaScript can be written only for those fields, which Threat as Field property is
True. -
Navigate to Mouse Enter property in the JavaScript section of the Properties pane. Use
 icon to open VisualXSL's JavaScript window. Usually it is used to paste (
Ctrl+V) the JavaScript written in a JavaScript editor, but this is a simple example and we can write our JavaScript code into the opened window:app.alert("Mouse entered the field", 2); -
Generate resulting document or preview results (PDF)
-
Open the generated PDF document
-
Move the mouse cursor to the field.
Mouse entered the fieldmessage is shown.
6.13. How to use Page Numbering
VisualXL 2.3 and higher versions contain a new field - Page number. Page Number is a Paragraph, which contains a special text, to show current page number in the document.
Procedure 6.7. To add a Page Number
-
Open/Create a new VisualXSL project
-
Click Add Page Number icon on the Toolbar menu or
Data | Add Page Numbermenu item -
Create resulting document and see page number on each page of the document
Note: By default,
Page Numberis inPage iofcountformat, whereiis the current page's number andcountis the count of the pages in the document.
6.14. How to use Symbols
VisualXSL 2.3 and higher contain a new feature, you can include symbols in your project.
Procedure 6.8. To use Symbol
-
Open/create a VisualXSL project
-
Add a Paragraph frame
-
Click
 icon on Toolbars. Character Map window opens.
 -
Choose the symbols by double-clicking on them or via Select button
-
Click Copy button and close the window
-
Open the paragraph and paste (
Ctrl + V) the selected symbols.Note: You can use (paste) the copied symbols for any allowed frame.
6.15. How to Use Mvp.Xml EXSLT Module
By default, VisualXSL is using native .NET libraries (MSXML) for XSL transformations during Preview and Generate Document operations. However, this library does not support EXSLT by its own. In order to employ EXSLT features for resulting documents, VisualXSL is capable using alternative library, Mvp.Xml Project: EXSLT.NET module.
Mvp.Xml is is a community-developed implementation of the EXSLT extensions to the XSLT 1.0 for the .NET platform. You can download it from its Web site, (http://mvp-xml.sourceforge.net/exslt/. After downloading, just unzip the binaries to VisualXSL folder.
No additional steps required. VisualXSL is looking for Mvsp.Xml.dll in its folder (same as the VisualXSL.exe is located) and if found, uses it via reflection.