
Chapter 5 of the VisualXSL User Guide
4. Getting Started
4.1. Opening the VisualXSL Application
Open the VisualXSL application by clicking its icon  on the desktop.
The application starts, with no project selected.
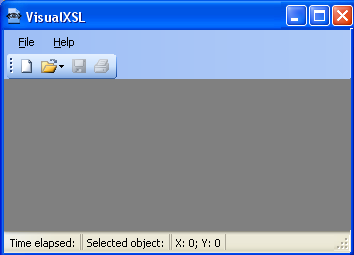 |
Figure 4.1. VisualXSL interface with no project opened
4.2. Opening an Existing VisualXSL Project
To open an existing project, do one of the following:
-
Click File | Open Project, and select the project that you want to open.
-
Click the
.VXLfile of the project that you want to open. -
Before closing VisualXSL, ensure that the Open last project on start toggle switch (located in the Options pane) is enabled (checked). When you launch VisualXSL next time, the last closed project will automatically be launched.
Note: Sample projects distributed with VisualXSL are located in :
For Windows 2000 and XP in:
All Users\Shared Documents\VisualXSL Projects\Samplesfolder.For Windows Vista and 7 in:
Users\Public\Public Documents\VisualXSL Projects\ Samplesfolder .
4.3. Creating a New VisualXSL Project
To create a new project:
-
If you want to create a new project from an existing project, the following should be done before continuing with the New Project dialog box.
- Create a new folder under
All Users\Document\VisualXSL Projects.
- Place the data source (XML file) and, optionally, the background file (PDF or image) in this folder.
- Create a new folder under
-
Click File | New to open the New Project dialog box and add a data source (the source XML).
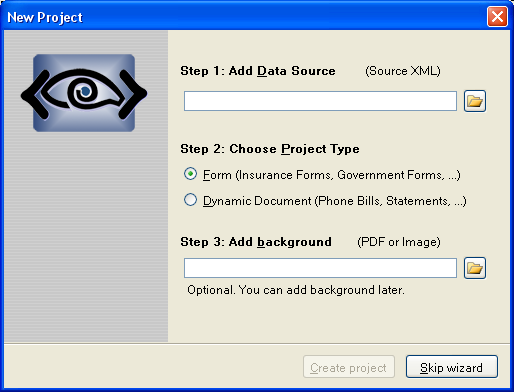
Figure 4.2. New Project dialog box
(More information about preparing an XML source and PDF background is presented in later chapters.)
- Use the New Project dialog box to choose the project type that is applicable to your needs: static or dynamic. Note that regardless of your choice, you can add both dynamic and static templates to the project.
- Optionally, use the Add Background field to add the background file (PDF or image). The background does not have to be added now; it can be added later.
- In the New Project dialog box, click the Create Project button. The folder and files to be used for the project are created, and the Main Window for VisualXSL opens.
Note: Click Skip wizard button to create blank project.
Click Cancel button to cancel new page addition
4.4. Main Window and Panes
The VisualXSL application has a docking style interface.
You can choose the windows from several predefined Main Window options from the Window menu: All Windows, Optimized, and Lightweight. Also using the Window menu, you can toggle the appearance of individual panes: Preview, Log, Source XML (XML Tree View), XPath List View, Properties, and Options. The last window configuration used is saved when VisualXSL exits successfully and is restored on the next application startup.
Note: Because the panes are dockable, they can be detached from their position in the VisualXSL Main Window by double-clicking them and then moved to elsewhere on the monitor (even outside the VisualXSL Main Window) or to a second monitor (if you are using a dual-monitor system).
The All Windows combination displays the following panes:
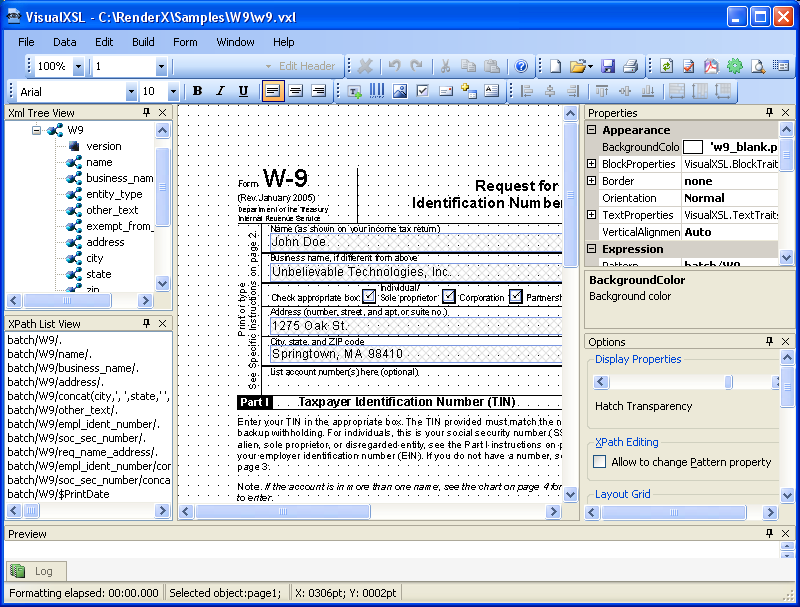 |
Figure 4.3. VisualXSL interface with the W9 sample project opened
-
** ** XML Tree View, at the upper left, displays the XML schema.
-
** ** XPath List View, at the lower left, displays a list of the XPath expressions.
-
Layout (Designer Area), in the upper middle of the screen, is the primary working area, where all data fields are placed according to the background form (only in static sections).
-
Properties pane, at the upper right, displays the properties of the selected data field object in the properties grid. (Sometimes this pane is referred to as “object properties”.) You can select several objects at once by clicking them with the Ctrl button pressed. Only the common properties of the selected objects are displayed. If the values of the properties are the same they are displayed with the current value, otherwise they are shown as blank.
-
Options pane, at the lower right, shows miscellaneous options.
-
Preview pane, immediately below Layout, shows the PDF document preview.
-
Log pane, at the bottom of the screen, stores the formatter messages.
Note: Each of the panes above, except of Layout, has a Pin (
 ) and a Close (
  ) button in its upper-right corner. You can pin dockable windows via Pin button. If a window is pinned, it will always stay on the screen, otherwise it will be hidden as soon as it is not focused.
4.5. Menus
Most of the basic commands are placed on the menus for quick access. Almost all of them are also available in the toolbars.
-
File menu
The File menu contains the following options:
-
New (Ctrl+N) - Opens a new project. Before opening a new project, you are prompted to save your changes to the current project.
-
Open Project (Ctrl+O) - Opens system's open file dialog, where you can select an existing project to open. Before opening a new project, you are prompted to save your changes to the current project.
-
Open Source XML (Ctrl+F) - Opens a system's open file dialog where you can select and add an XML data source to the project.
-
Save (Ctrl+S) - Saves the current project, with changes.
-
Save As (Ctrl+Shift+S) - Saves the current project, with changes, under a new name.
-
Print (Ctrl+P) - Prints the last generated PDF document. If you haven't created a resulting PDF or haven't previewed the result of XSLT, a warning message will be shown.
-
Recent Projects - Displays a list of recent projects.
-
Exit - Quits the VisualXSL application. You are prompted to save your changes.
-
-
Data Menu
The Data menu contains the following options:
-
Add Text Frame - Adds a text field to the layout, according to the XML source file. Current XML node's XPath expression is used to get the data from the XML source file. Note, that text frames can get static text as well as XPath.
-
Add Barcode - Adds a barcode field to the layout, according to the XML source file. Current XML node's XPath expression is used to get the data from the XML source file. Note, that barcodes can get static text as well as XPath (see detailed description in Barcode subchapter, in Data Fields and Properties chapter).
-
Add CheckBox - Adds a checkbox to the layout. The item's Test property (under Expression group) can be specified to render the checkbox under only certain conditions. It must have the correct XPath expression in the context of the node set, as determined by the expression from Pattern property (see detailed description in Checkboxes subchapter, in Data Fields and Properties chapter).
-
Add Image - Adds an empty image field to the layout. Note: You must correct ImageUrl to generate images from the XML content. For example, to use the XML element content as the partial name for an image : XPath property must be updated as the following :
concat('http://myintranet/images/', {xpath-value}, '.jpg')(see detailed description in Image subchapter, in Data Fields and Properties chapter). -
Add Address Block - Starts a wizard that adds an address label to the layout (see detailed description in Address Block subchapter, in Data Fields and Properties chapter).
-
Add Paragraph - Adds an empty paragraph data field to the design layout (see detailed description Paragraph Block, in Data Fields and Properties section).
-
Add Table - Adds a table to the layout (see detailed description Table, in Data Fields and Properties section).
-
Add Page Number - Adds a Page Number to the layout (see detailed description Page Number, in Data Fields and Properties section).
-
Add Button - Adds a Button to the layout (see detailed description Button, in Data Fields and Properties section).
-
Add List Box - Adds a List Box to the layout (see detailed description List Box, in Data Fields and Properties section).
-
Add Combo Box - Adds a Combo Box to the layout (see detailed description Combo Box, in Data Fields and Properties section).
-
-
Edit Menu
The Edit menu contains the following options:
-
Insert Symbol- Inserts symbols in your project. -
Remove From Layout- Removes the selected data field(s) from the layout. -
Add Section(Alt+P) - Adds a new section to the project. -
Remove Section(Alt+R) - Removes the current section from the project. -
Edit Section Header- Used only for dynamic sections. This option is for editing the static header of the current dynamic section. -
Undo(Ctrl+Z) - Rolls back the last action. -
Redo(Ctrl+Y) - Redoes the last undone action.Note: For more information about Undo and Redo operations see Undo/Redo Operations subchapter.
-
Cut(Ctrl+X) - Removes and copies the selection to the clipboard. -
Copy(Ctrl+C) - Copies the selection to the clipboard. -
Paste(Ctrl+V) - Inserts the contents of the clipboard at the location of the cursor, and replaces any selected text or objects. -
Edit Table- If a table data field is selected, that table's editor opens; if a table editor is opened, that editor closes; if no table is selected or multiple data fields are selected, this option is passive. -
Edit Paragraph- If a paragraph data field is selected, that paragraph's editor opens; if a paragraph editor is opened, that editor closes; if no paragraph is selected or multiple data fields are selected, this option is passive. -
Edit Address Block- If a address block data field is selected, that address block's editor opens; if a address block's editor is opened, that editor closes; if no address block's is selected or multiple data fields are selected, this option is passive.
-
-
Build Menu
The Build menu contains the following options:
-
Refresh - Refresh all data fields in the project.
-
Validate (F6) - checks all XPath expressions in all data fields in the project.
-
Generate XSL (F5) - Generates an XSL for the current project.
-
Preview (Ctrl+F5) - Generates preview for current project and shows it in the Preview pane.
-
Create Resulting Document (Ctrl+Shift+F5) - Creates the resulting document from the current project.
-
Set Output Format - Set your desired output format from the current project.
-
PDF- .pdf output file -
PostScript- .ps output file -
AFP- .afp output file -
XEP Intermediate- .xep output file -
SVG- .svg output file -
HTML- .html output file -
XPS- .xps output file
-
-
Window Menu
The Windows menu contains the following options:
-
All Windows - Shows all windows. If this option is selected a check sign appears.
-
Optimized - XPath List, Options, Preview, and Log panes are minimized. If this option is selected a check sign appears.
-
Lightweight - Xml Tree View, XPath List, Options, Preview, and Log panes are minimized. If this option is selected a check sign appears.
Note: Only one of the above mentioned options can be selected
Note: The last used window configuration is saved when VisualXSL exits, and is restored on the next application startup.
-
Reset Toolbars - Toggle set toolbars' deafult positions.
-
Preview - Toggle switch for showing/hiding the Preview pane.
-
Log - Toggle switch for showing/hiding the Log pane.
-
Source XML - Toggle switch for showing/hiding the Xml Tree View pane.
-
XPath List - Toggle switch for showing/hiding the XPath List View pane.
-
Properties - Toggle switch for showing/hiding the Properties pane. The Properties pane is described in Data Fields and Properties chapter.
-
Options - Toggle switch for showing/hiding the Options pane. The Options pane is described at the end of this chapter.
-
List Open VisualXSL Projects. Lists all the VisualXSL projects that are open. The project that you are currently working on is checked. To work on a different project, click its name.
-
-
Help Menu
The Help menu contains the following options:
-
Contents (F1) - Opens VisualXSL User Guide.
-
About - Lists general information about the application.
-
4.6. Toolbars
Most of the basic commands are placed on the toolbars for quick access. Almost all of them are also available in the menus.
-
-
 New Project - creates a new project.
 -
Open - is a drop-down list with the following options:
-
 Open Project - loads an existing project.
 -
 Open Source XML - opens and adds an XML data source to the project.
-
-
 Save - saves the current project with changes.
 -
 Print - Prints the last generated PDF document. If you haven't created a resulting PDF or haven't previewed the result of XSLT, a warning message will be shown.
-
-
-
 Add Text Frame - Adds a text field to the layout, according to the XML source file. Current XML node's XPath expression is used to get the data from the XML source file. Note, that text frames can get static text as well as XPath.
 -
 Add Barcode - Adds a barcode field to the layout, according to the XML source file. Current XML node's XPath expression is used to get the data from the XML source file. Note, that barcodes can get static text as well as XPath (see detailed description in Barcode subchapter, in Data Fields and Properties chapter).
 -
 Add Image - Adds an empty image field to the layout. Note: You must correct ImageUrl to generate images from the XML content. For example, to use the XML element content as the partial name for an image : XPath property must be updated as the following :
 concat('http://myintranet/Images/VisualXSL/', {xpath-value}, '.jpg')(see detailed description in Image subchapter, in Data Fields and Properties chapter). -
 Add CheckBox - Adds a checkbox to the layout. The item's Test property (under Expression group) can be specified to render the checkbox under only certain conditions. It must have the correct XPath expression in the context of the node set, as determined by the expression from Pattern property (see detailed description in Checkboxes subchapter, in Data Fields and Properties chapter).
 -
 Add Address Block - Starts a wizard that adds an address label to the layout (see detailed description in Address Block subchapter, in Data Fields and Properties chapter).
 -
 Add Table - Adds a table to the layout (see detailed description Table, in Data Fields and Properties section).
 -
 Add Paragraph - Adds an empty paragraph data field to the design layout (see detailed description Paragraph Block, in Data Fields and Properties section).
 -
 Add Button - Adds a button to the design layout (see detailed description Button , in Data Fields and Properties section).
 -
 Add List Box - Adds a 'select box' to the design layout (see detailed description List Box , in Data Fields and Properties section).
 -
 Add Combo Box - Adds a 'combo box' to the design layout (see detailed description Combo Box , in Data Fields and Properties section).
-
-
-

Remove From Layout(Del) - Removes the selected data field(s) from the layout. -

Undo(Ctrl+Z) - Rolls back the last action. -

Redo(Ctrl+Y) - Redoes the last undone action.Note: For more information about Undo and Redo operations see Undo/Redo Operations subchapter.
-

Cut(Ctrl+X) - Removes and copies the selection to the clipboard. -

Copy(Ctrl+C) - Copies the selection to the clipboard. -

Paste(Ctrl+V) - Inserts the contents of the clipboard at the location of the cursor, and replaces any selected text or objects. -

Symbol- Can include symbols in your project
-
-
-

Refresh Design Layoutcalculates all XPath expressions and refreshes the data fields content on the design layout (where possible). -

Validate Projectchecks all XPath expressions in all data fields in the project. -

Create Resulting Documentgenerates a document (PDF, PostSript, AFP, IREn Intermediate, SVG, HTML or XPS) using all data records from the data source. -

Generate XSL Stylesheetgenerates an XSL stylesheet for the current layout. This stylesheet can be used with the RenderX IREn formatter to produce PDF files. -

Preview Result of XSLTgenerates a PDF document preview, using the specified number of data records. -

Create Local TranslateProject.xslallows the customer to keep his/her own TranslateProject.XSL in project directory.
-
-
-
 Align Left aligns the selected data field to the left of the data field.
 -
 Align Center aligns the selected data field to the center of the data field.
 -
 Align Right aligns the selected data field to the right of the data field.
 -
 Align Lefts aligns the selected data fields to the left side of the first selected data field.
 -
 Align Centers aligns the selected data fields to the (horizontal) center of the first selected data field.
 -
 Align Rights aligns the selected data fields to the right side of the first selected data field.
 -
 Align Tops aligns the selected data fields to the top of the first selected data field.
 -
 Align Middles aligns the selected data fields to the middle (vertical center) of the first selected data field.
 -
 Align Bottoms aligns the selected data fields to the bottom of the first selected data field.
 -
 Make Same Width makes selected data fields' widths the same as the width of the first selected data field's.
 -
 Make Same Height makes the selected data fields' heights the same as the height of the first selected data field's.
 -
 Make Same Size makes the selected data fields' sizes the same as the size of the first selected data field's.
-
-
-
 Scale Layout scales the layout.
 -
 Choose Section switches the current section (available for multi-section forms).
 -
 Help opens the VisualXSL User Manual.
 -
 Choose Section Template selects the current template from the list of available templates.
Note: The Choose Section Template option is available only for a dynamic sections.
-
 Edit Header is used to edit the static header of the current template.
Note: The Edit Header option is available only for a dynamic sections.
-
 Font Family is used to change the font of the selected text.
 -
 Font Size is used to change the font size of the selected text.
 -
 Bold is used to change the font of the selected text to/from bold.
 -
 Italic is used to change the font of the selected text to/from italic.
 -
 Underline is used to change the font of the selected text to/from underline.
-
4.7. Options Pane
The Options pane contains the following options:
-
Display Properties
- Hatch Transparency is a slider for changing the transparency of the background. To make the background more transparent, move the slider to the left.
-
XPath Editing
- Allow changes to Pattern property specifies whether the Pattern property (under Expression, in the Properties pane) may be changed. This allows the user to deviate from the supposed/default page pattern.
-
-
Snap to Grid switches on/off data fields' align to the grid in the layout designer area.
Note: Snap to grid is used only for static sections.
-
Grid Size sets the size of the grid cell in pixels.
Note: Is active only if Snap to grid is switched on. The minimum allowed size is 4 pixels and the maximum allowed sized is 60 pixels.
-
Draw Grid switches on/off the grid draw.
Note: If the grid size is too small for the selected scale, the grid will not be displayed.
-
-
-
Number of records to preview enables you to limit the number of records used to generate the preview. It can be useful when the source XML contains a large number of records.
-
Open last project on start switches on/off the automatic opening of the last project at the application's next start.
-
Render form background switches on/off the generation of the form background.
Note: Only the Number of records to preview and Render form background options will take an effect immediately; the other options require application restart.
-
-
-
File Format is the raster format of the image file.
-
Color Depth is the number of bits per pixel in an image format used to rasterize the form background.
-
Rasterized resolution (in DPI) specifies the horizontal and vertical resolution of the rasterized image of the form background.
-
4.8. Undo/Redo Operations
Most actions that are made in Layout and Properties panes can be rolled back using the Undo and Redo commands. Note the following points regarding changes, actions, and operations:
-
All changes made to a data field object while it is still selected are considered to be one action, therefore Undo/Redo treats them as a single action. For example, if both the size and position are changed while the same data field is selected, Undo will roll back both changes. However, if the size is changed for one data field and the position for a second data field, Undo will roll back the last action only.
Note: In VisualXSL Undo and Redo operations are multistep operations. It means that you can roll back and forward the last operations multiple times.
-
Operations to add or remove sections cannot be undone.
The selected data fields, or a selected whole section, can be copied to the Clipboard, and then pasted one or more times to the same or another window of the application (if more than one project is being edited at the same time).
Important: Make sure that newly pasted data field has the correct XPath expression. To do this, either select Build | Validate, or press F6, or click the Validate Project toolbar button.